![]()
![]()
Please donate just 1 Eur/1.3 USD. Why not take 2 min to do it now?
Learning Alias sponsors the Education of children in Nepal. This is Deepana and we need to raise money to put her through Nursing College in Kathmandu. Learning Alias Blog is a free service, but if you would like to show your appreciation, please make a small donation. 100% of your money will go directly to pay Deepana’s college fees. Without the help of sponsors in the developed world, Deepana would receive no education whatsoever, as she comes from a remote Hymalayan village. Thank You for your kindness, graham bullock.
PayPal or Credit Card. NB: US Credit Card accepted
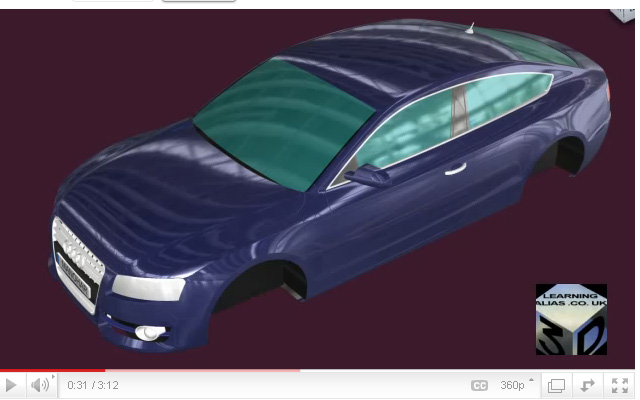
Pictured below is an Audi A5 Sportback built by one of my students who is now a Digital Sculptor for GM.
Full HD video, just click the picture below
I am now putting some of my tutorials on YouTube, so whilst you’re there you may wish to check them out. There’s a full tutorial on how to create a Ball Corner to Class A Surfacing, Catia V5 spec.
You can now watch ALL my Video Tutorials on a state of the art, purpose built website.
Click Here for Videos

See just how quickly you can learn Automotive Modeling, with a Pro. Alias Trainer to help you
NURBS FROM MESH VIDEO click here
For student’s who have the objective of finding a CAD job in the near future, I still teach One to One students and all of these students get Automotive Modeling or Design/Modeling jobs, so it’s a great investment to make.
Check-Out my Customer Feedback,
Many of my students make it to the top and succeed in becoming pro. Alias Digital Modelers. The hourly rate is very high and there are vacancies in UK. France, Germany, USA, Brazil etc.
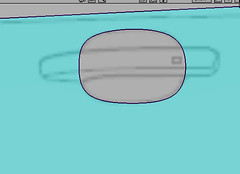
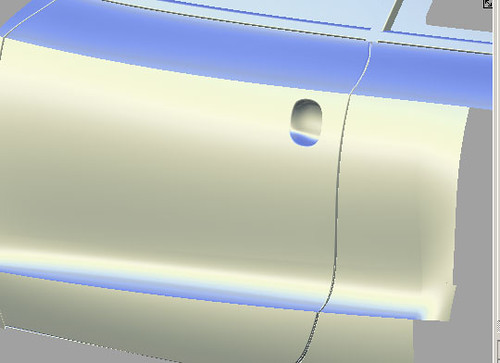
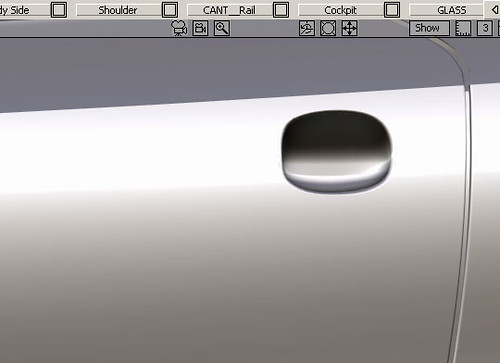
I’ve built a beautiful door and it seems a shame to cut into it,
but that’s the nature of car design mostly this would be detailed enough to be sent off an milled out in clay for further Styling shows and further development and in fact often even the shut lines are not required, as if any changes are required to the body side or hood top, the first thing the clay modellers will do is fill in the shut lines. However if you’re modelling for a later stage of the design process, details like door handles may be required
Today I am going to show you one method for modelling a depression into the door,
as part of the door handle set up. If you are building a complete exterior the chances are that details like door handle depressions would be added for aesthetics and exact dimensions wouldn’t be required. The accurate modelling would be done at a later stage on a panel by panel basis. So our task is to get the periphery right and not worry about tight dimensions beyond that. Usually it would be the clay dept. who put the fillets around our depression, but today I’ll show you a way of doing that job too.
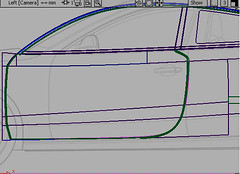
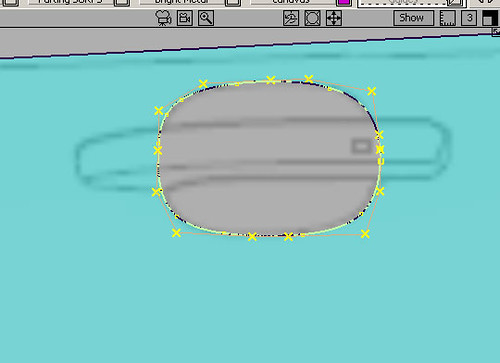
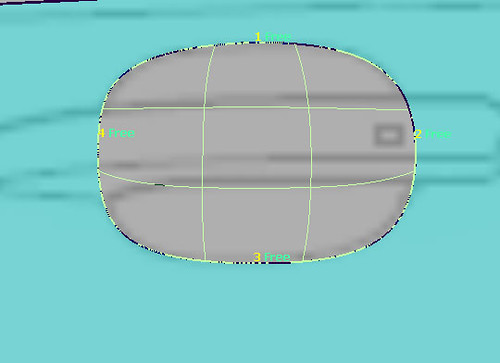
Select just the surfs. that you need and make everything else invisible (hide unselected)
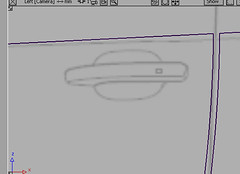
Get right up close
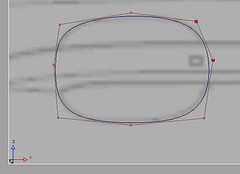
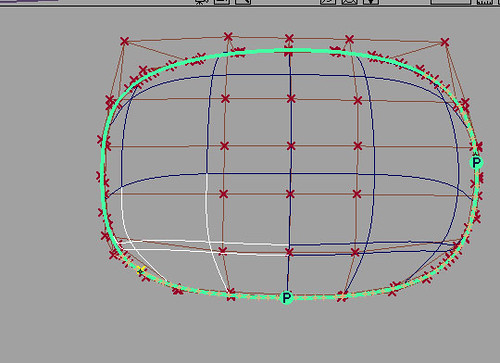
Place a circle in the middle of the depression
and using Non-Prop scaling and then Move Cv match your curve to the outline on the canvas plane
Attach 2 deg 5 curves across the axes

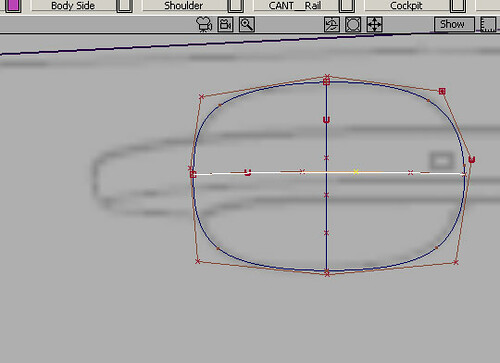
Helper Curves
In the Top view pull out the first curve to meet the Stylists dimensions approx. Then improve the accuracy with the Move CV tool.Now do the same on the second crv. in the back view
Using your circular curve trim discard and create the hole
Place a rebuild crv. on the trim edge (set to reduce spans)
I’m pushing my luck a bit here using only 15 or so CV’s. You could use 20 to be safe>Object Edit>Detach the rebuild crv in four corners to create 4 curves for the operation of the Square Surf. tool
Build a square surf.
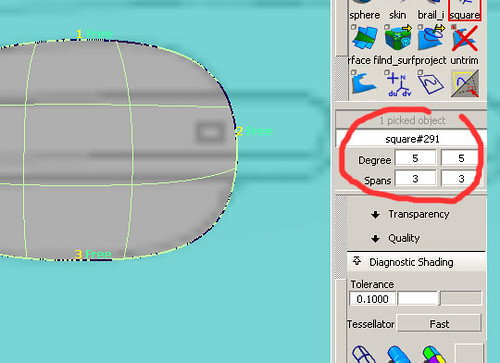
I’ve made mine 5,5,3,3 to keep it flexible enough to allow me to do some serious pulling on the internal CV’s
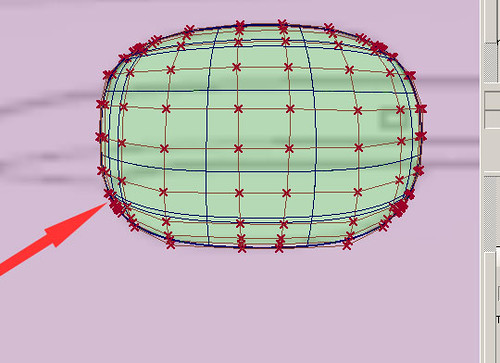
>Object Edit>Insert and insert an extra 2 rows of Cv’s as close to the boundaries as possible
This is to ensure that we don’t loose GO once we start radically yanking at the internal CV’s
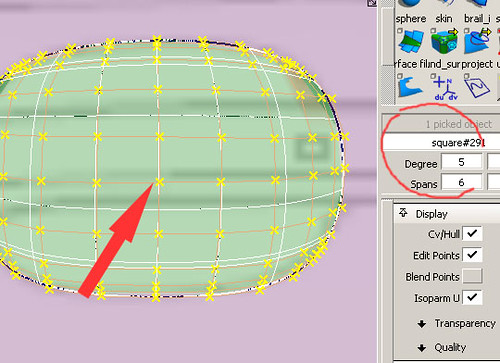
In the Control Panel I have added an extra Cv in one direction,
as I want to pull from the center of the depressionYou may want to use less spans, that’s OK but you need to end up with a central CV
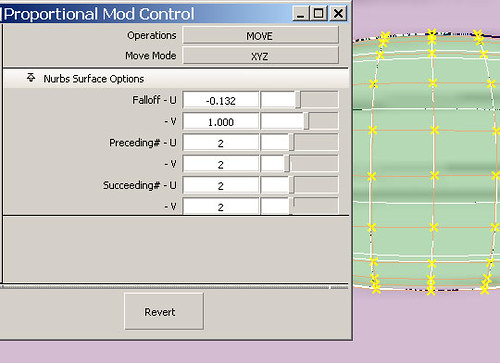
You can see how I have set up the Proportional Modification Control to best deform the surface into a soap dish depression
My graphic shows Move Mode as XYZ, but actually I used NUV as we are in local geo.This tools requires an ocean of practise if you want to be able to use it quickly and efficiently
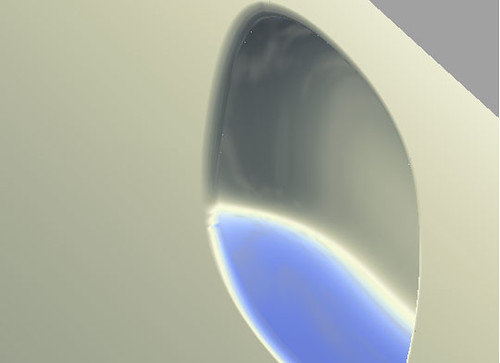
In the Back view pull out the central Cv until the surf at that point meets the helper crv.
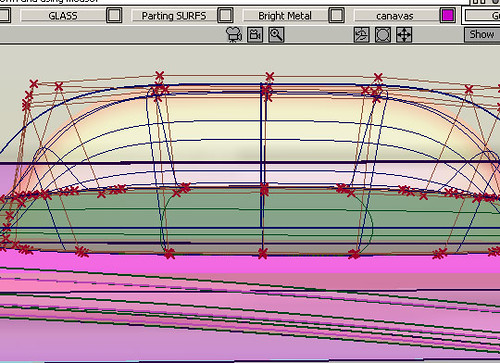
Top View: Adjust your amount of in/out pull
to the left and right it’s obvious that the dish is not the same profile as the helper crvs, so pull the CV’s Move CV with the appropriate axes restrained until you get a good fit. This is really hard at first, but with prctice you get good at it

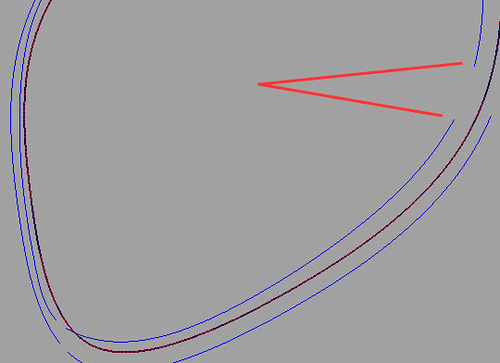
Red lines are pointing to the helper crvs.
It’s absolutely vital to maintain GO (position at the surf. boundaries)
If you don’t have GO then try to recover with the Align tool, but you may have to delete the surf. and start again
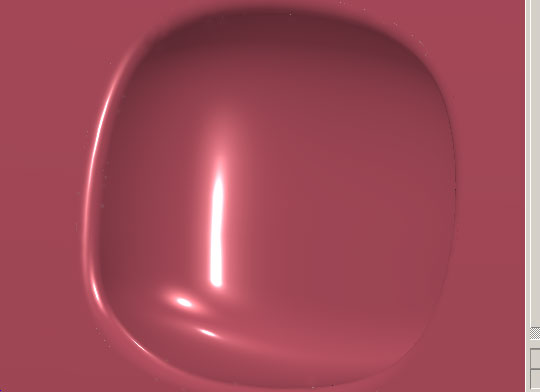
OK here I’m pulling the last 3 rows of CV’s so that they appear underneath the locators.
I’m doing this because if I don’t I wont havea good angle of intersection for building a fillet
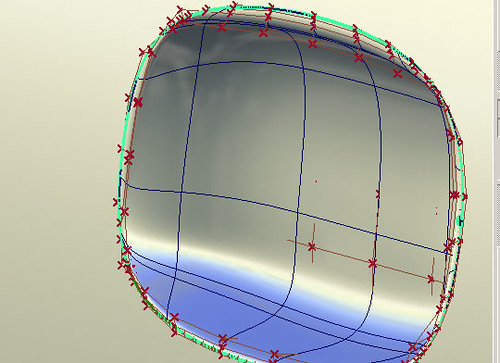
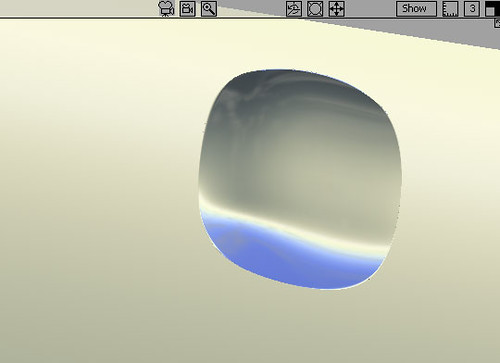 This is what we’ve achieved so far and this is good enough to go to be milled in clay or polyester
Tubular Flange Control
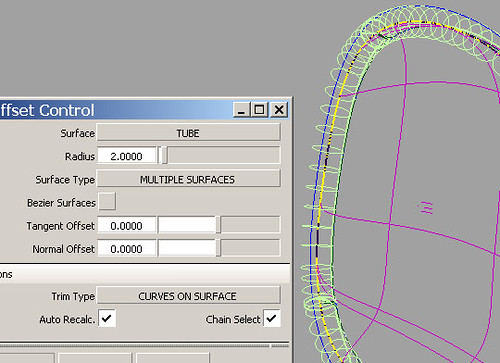
 I’ve run a tubular surf all the way around, but where my trim edge is fragmented I am going to show you how to repair the C-O-S, because you need to know how to tweak them. It’s a big part of Alias Studio Modelling.
In real life I don’t have time to do this extra work,
so I would un-trim the aperture and recover the unbroken C-O-S that we started out with. I would then run the Tubular Flangeraround that and then Intersect it with both the depression and the door skin and then trim and delete the center surf. again
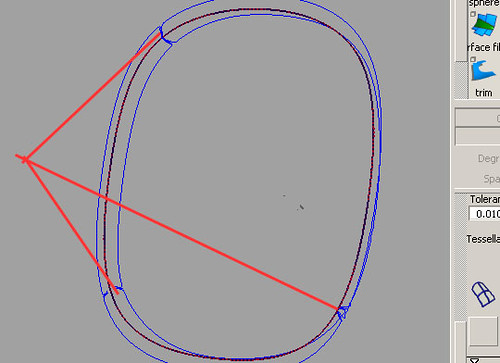
I repaired my C-O-S as follows:
Detach tool to get rid of the broken bitsJoin up the ends with deg. 5 crvs>Object Edit>Align Tool to align the 8 deg 5 crvs with the C-O-SProject normal set to 0.001Delete the 8 deg 5 crvs_______________________
OK: back to the standard work flow!
Next I ran the Free Form Fillet control around. If you have good clean continuous C-O-S then choose the Single Surface optionBecause I did all this repair work on my C-O-S, I used Multiple SurfacesI could explain all the ins and outs to you, but the best way to learn how these Alias Tools function, is by trying both workflows
Once I’d built the fillets I manually trimmed. I think it’s looking good. I hope you agree
This is the bit that all Alias Studio Modellers love the most, crank the Rendering Controls up to Max and
then sit back and enjoy your own work
Hmmmm! Needs a lick of paint
Here it is with Shader Anti Alias on High and Showroom Diagnostics turned up high
It’s what we live for!
Enjoy
graham
_____________________________________________________________
To Learn Alias Automotive to Industry Entry level has been made easier.
For student’s who have the objective of finding a CAD job in the near future, I still teach One to One students and all of these students get Automotive Modeling or Design/Modeling jobs, so it’s a great investment to make. The hourly rate is very high and there are vacancies in UK. France, Germany, Sweden, Spain, USA, Brazil etc. I can only take a maximum of 5-7 students at any one time. I teach all levels right up to Post Graduates. I have never had a Private student fail to get an Alias Automotive job (Companies include Ferrari, GM, Lotus, Opel, Audi Seat etc. ). If you wish to apply for a place, please email me with all your details.
Why not visit my website and take a look for your self?
Over 100 videos on many, many aspects of Learning Pro. Alias
I show you how to build a Complete Audi A5 Sportback (ext.) . Over 50 Videos on that alone !
Info. on Courses:
“Course #1”.
6 Months website access to all website based video tutorials, 167 Euros (215 USD equivalent Sept. 2012)
“Course #2”.
167 Euros (215 USD equivalent Sept. 2012) per month. You get your .wire reviewed by me every 15 days and you will receive : feedback, instruction, tips and advice from me personally. Access to all videos including my ” Private Student Training Videos”. You will build at least 3 complete automotive exteriors. The course also includes an intensive Reverse Engineering section, which required by most employers.
“#3 Full Pro. “Elite” Course”.
Fast Track Full Pro. “One to One” Course with weekly reviews and coaching 200-250 Euros (USD. 260-320 approx. Sept. 2012) per month. One to One Private tuition. You will receive specific geometry and meshes and modeling from me personally where required, to help you to complete your exteriors quickly to an Industry entry level standard. This means a bigger investment, but once in an Alias modeling job you will get back what you invested many times over and be able to work anywhere in the world
NB: Typically students pay 50% of the cost of the “Elite” course by monthly installments settling the balance over time, once they have an Alias Automotive contract.
For more info,
Just register on my website and I’ll send you all the details
www.learningalias.co.uk
*** Special 25% Discounts for US students (Message me on my website for details)

USA:
If you are in the USA, just register and login, then go to Profile and you can pay your subscription with your US credit card. Absolutely no extra charges for currency conversion.
Regards
Graham Bullock B.Ed.(CNAA)Des.Tech.