
![]() Learning Alias sponsors the Education of children in Nepal. This is Deepana and we need to raise money to put her through Nursing College in Kathmandu. Learning Alias Blog is a free service, but if you would like to show your appreciation, please make a small donation. 100% of your money will go directly to pay her college fees. Thank You, graham bullock.
Learning Alias sponsors the Education of children in Nepal. This is Deepana and we need to raise money to put her through Nursing College in Kathmandu. Learning Alias Blog is a free service, but if you would like to show your appreciation, please make a small donation. 100% of your money will go directly to pay her college fees. Thank You, graham bullock.
Alias Wheel Tutorial – Part – 2
Alias Wheel Tutorial – part – 2Author: graham
Objectives of part – 2
-
Create revolve surf. 36 deg segment for rim
-
Create Hub Curves
-
Build center milled rebate for wheel center Cap
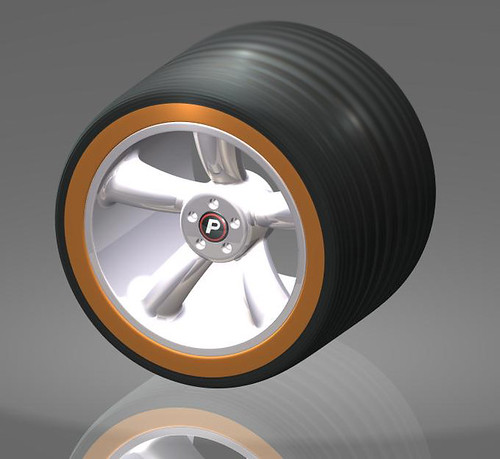
 In the Perspective view go to >palette>surface>revolve tool and and set it up as shown.Select the rim crv. and make a 36 deg. revolved surf. from the Z axis (Important set the tool to revolve on the “Y” axis)Make a new layer, call it Rim and assign your surface.
Hub Curves
 In the front view lay down 3 key lines Palette>curves>keypoint curve toolbox
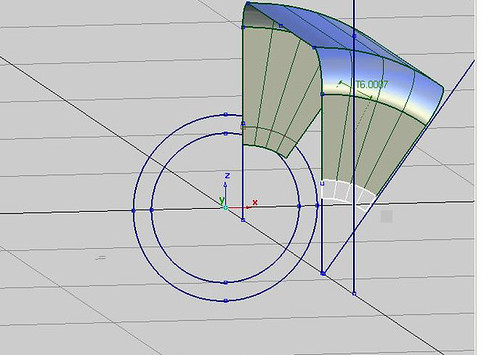
 Typically the hub would be either flush with the rim in the plan view or slightly inboard of the outer rim flangeBuild your curves up from the Y axis.>palette>curve edit> curve fillet tool and create fillets on the top outer and top inner corner of the hub crvs. (If you create history whilst you are using this tool, it wont work, so just select the offending crv. and delete its history >delete>delete construction hist.)Revolve your hub crvs. 36 deg, exactly as you did your rim.
 Create a new layer and name it Hub. Assign your surf.In the Left view snap a circle to the origin LHM+Alt.Scale circle to the size that you want your center cap to be, then copy and paste the circle (In this tutorial copy and paste is always Ctrl+C, Ctrl+V)The copied crv. is now active, so scale it down 5mm in its radius to represent the milled hole which will run through the center of the cast wheel.
Creating the Offset Milled Land For The Cap Aperture
 In the Left view project your 2 circles onto the hub’s front and back surfs.Trim divide to create a “C” shaped surf, which will be the milled land to allow the center cap to be driven home. Delete the 2 small triangular surfs.
 In the Perspective view, move the “C” shaped surf. inwards along the Y axis 5mm
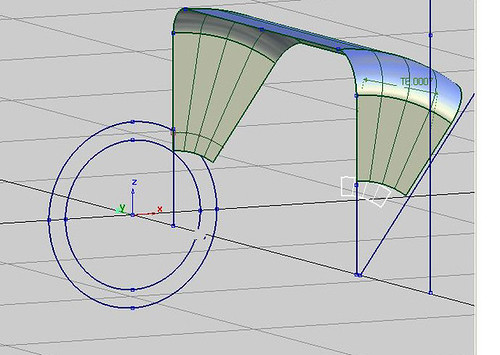
 Using the Skin tool. create a surf. from the hole in the hub to the edge of the “C” surf. and another one to create the surf. of the hole which will be milled right through the casting.________________________________________________________________