Autodesk Alias Studio Tutorial – Automotive Model Nearing Completion

My  Super Car Model is Nearing Completion

I could stop now and call it a day or I could continue adding detail such as grilles, finishing beads around screens and parting lines. Also I could Build a Rear Spoiler and put tread on the tyres.

What’s Been Done Today

I have built a half interior. This is used on exterior models in industry. A carpeted board is fitted inside the clay/fibre glass model at the waist line height and then half a steering wheel, the top part of the seats and the top section of the dash board are fitted. All this gives a more realistic looking model. Often models are built of clay over a wooden armature and later on in the project the screens are cut out and this dummy interior is fitted after which acrylic is fitted to form a realistic glass house.

Everything on the Model is Pulled Out of a Basic Planar surface.

Piggy back surfaces were built where the dash and seats would bee and then the components were formed by pulling a single CV using the Proportional Modification Control.
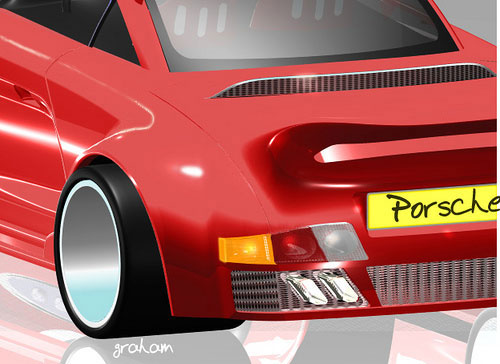
Wheels

I have revolved some simple wheels keeping the surfaces as light as possible, so that I can still toggle the model easily with the wheels displayed. If I make a set of complex wheels for this model, I’ll build them in another stage and then only import them when I want to do a full on rendering of the complete modelinterior-1ainterior-1________________________________________________________________

To Learn Alias Automotive to Industry entry level has been made easier. Why not visit my website and take a look for your self?

www.learningalias.co.uk

My New Website is now live!

I am a top flight Alias Trainer/Modeler, specializing in taking students who are either currently studying or who have left college/university and want to learn the skills they need to reach Alias Automotive Entry Level. I offer the best value Alias training deal out there!

Special Winter Discount Package

Courses in order of cost:

“Course #1”.6 months Website Access

6 Months website access to all video tutorials, 167 Euros one-off payment (228 USD equivalent Nov.2011)

Courses, including reviews and coaching:

“Course #2A” Private Tuition Package

167 Euros per month (228 USD equivalent Nov.2011)
(Your work will be reviewed every 15 days and you will receive : feedback, instruction, tips and advice from me personally, modeling demonstrations from me on your .wire and I will supply Meshes to help you with difficult areas of your model).

“Course #2E” Economy Private Tuition Package

100 Euros (135 USD equivalent Nov.2011) per month. You get your .wire reviewed by me every 15 days and you will receive : feedback, instruction, tips and advice from me personally. Access to all website videos

“Course #3”. Fast Track Full Pro. “One to One” Course

250 Euros (USD. 339 approx. Nov. 2011) per month. One to One Private tuition with weekly reviews of your .wire. You will receive specific geometry and meshes and modeling from me personally where required, to help you to complete your exteriors quickly to an Industry entry level standard. This means a bigger investment, but once in an Alias modeling job you will get back what you invested many times over and be able to work anywhere in the world

For more info,

Just register on my website and I’ll send you all the details
www.learningalias.co.uk

USA:

If you are in the USA, just register and login, then go to Profile and you can pay your subscription with your US credit card. Absolutely no extra charges for currency conversion.

Regards

Graham Bullock B.Ed.(CNAA)Des.Tech.

Nurbs Modeling, Alias Course

Autodesk Alias Studio Tutorial – A Halogen Headlamp

Alias Studio Tutorial

0_car_1

Where to Start With A weird Shaped Headlamp Assy.

Please Note: This is not a pre-production modelled assy. It’s just a freehand model to fill the head lamp aperture, so that you can’t see inside the car body

I started with the apperture by building a small fillet flange around it normal to the aperture.

Next

I built a Draught Flange Back from the fillet flange about 200mm deep. I then intersected the flange with a planar surf. and trimmed it all clean. Now I put a construction plane onto the planar surf, so I could see it in true view. That enabled me to build a square with bulging sides and project it onto the planar. I then built a piggy back square onto the planar surf 5 deg 2 by 5 deg.2. When I build a piggy back surface to be pulled out, I always add 2 rows of CV’s at each boundary of the sq.

Trim Out the Square which is underneath the piggy back square

Now I was ready to pull out the basic form of the main reflector using the Proportional Modification Control. After that I put 2 cylinders in to make the actual lights. I built a planar surf. to close the ends on both cylinders and then pulled smaller reflectors out from those. When I’d done that, I intersected the cylinders with the main reflector and trimmed it all back clean.

Pictures Tell the Story

Up Close and Dirty________________________________________________________________

To Learn Alias Automotive to Industry entry level has been made easier. Why not visit my website and take a look for your self?

www.learningalias.co.uk

My New Website is now live!

I am a top flight Alias Trainer/Modeler, specializing in taking students who are either currently studying or who have left college/university and want to learn the skills they need to reach Alias Automotive Entry Level. I offer the best value Alias training deal out there!

Special Winter Discount Package

Courses in order of cost:

“Course #1”.6 months Website Access

6 Months website access to all video tutorials, 167 Euros one-off payment (228 USD equivalent Nov.2011)

Courses, including reviews and coaching:

“Course #2A” Private Tuition Package

167 Euros per month (228 USD equivalent Nov.2011)
(Your work will be reviewed every 15 days and you will receive : feedback, instruction, tips and advice from me personally, modeling demonstrations from me on your .wire and I will supply Meshes to help you with difficult areas of your model).

“Course #2E” Economy Private Tuition Package

100 Euros (135 USD equivalent Nov.2011) per month. You get your .wire reviewed by me every 15 days and you will receive : feedback, instruction, tips and advice from me personally. Access to all website videos

“Course #3”. Fast Track Full Pro. “One to One” Course

250 Euros (USD. 339 approx. Nov. 2011) per month. One to One Private tuition with weekly reviews of your .wire. You will receive specific geometry and meshes and modeling from me personally where required, to help you to complete your exteriors quickly to an Industry entry level standard. This means a bigger investment, but once in an Alias modeling job you will get back what you invested many times over and be able to work anywhere in the world

For more info,

Just register on my website and I’ll send you all the details
www.learningalias.co.uk

USA:

If you are in the USA, just register and login, then go to Profile and you can pay your subscription with your US credit card. Absolutely no extra charges for currency conversion.

Regards

Graham Bullock B.Ed.(CNAA)Des.Tech.

Nurbs Modeling, Alias Course

Autodesk Alias Studio Tutorial – Sports Car Spoiler

Making a Front Spoiler Autdesk Alias

I kept the front spoiler simple. The design is borrowed from a classic Porche Turbo Body Kit, but the rear will have something far more complicated

Made from Planar Surfaces

I started with a planar surface sitting at the origin in the top view. The back porifile was achieved by Projecting Normal from the lower edge of the body panels

Next I took Duplicate Curves

from the lower body panels and moved them forward to give a projection line for the front edge of the spoiler

From Now On It’s Just Leggo Blocks

Duplicat the profiled surf you have at the origin and move it up a material thickness and back to suit the overall angle your spoiler assy. will be set at

I Got Shot of the Pink Car paint

and brought in a Ferrari Red one. I start with an imported shader and then modify the colour and ramps to suitSporting Basic Wheels for the First Time - The Setting of the Windscreen Shader Must be Just right in Order to Get Both Reflection and Also be Able to See the Dummy Interior

HMMMMM?????

I think I need to model up some head lamp reflectors pronto________________________________________________________________

To Learn Alias Automotive to Industry entry level has been made easier. Why not visit my website and take a look for your self?

www.learningalias.co.uk

My New Website is now live!

I am a top flight Alias Trainer/Modeler, specializing in taking students who are either currently studying or who have left college/university and want to learn the skills they need to reach Alias Automotive Entry Level. I offer the best value Alias training deal out there!

Special Winter Discount Package

Courses in order of cost:

“Course #1”.6 months Website Access

6 Months website access to all video tutorials, 167 Euros one-off payment (228 USD equivalent Nov.2011)

Courses, including reviews and coaching:

“Course #2A” Private Tuition Package

167 Euros per month (228 USD equivalent Nov.2011)
(Your work will be reviewed every 15 days and you will receive : feedback, instruction, tips and advice from me personally, modeling demonstrations from me on your .wire and I will supply Meshes to help you with difficult areas of your model).

“Course #2E” Economy Private Tuition Package

100 Euros (135 USD equivalent Nov.2011) per month. You get your .wire reviewed by me every 15 days and you will receive : feedback, instruction, tips and advice from me personally. Access to all website videos

“Course #3”. Fast Track Full Pro. “One to One” Course

250 Euros (USD. 339 approx. Nov. 2011) per month. One to One Private tuition with weekly reviews of your .wire. You will receive specific geometry and meshes and modeling from me personally where required, to help you to complete your exteriors quickly to an Industry entry level standard. This means a bigger investment, but once in an Alias modeling job you will get back what you invested many times over and be able to work anywhere in the world

For more info,

Just register on my website and I’ll send you all the details
www.learningalias.co.uk

USA:

If you are in the USA, just register and login, then go to Profile and you can pay your subscription with your US credit card. Absolutely no extra charges for currency conversion.

Regards

Graham Bullock B.Ed.(CNAA)Des.Tech.

Nurbs Modeling, Alias Course

Autodesk Alias Studio Tutorial – Side Light Reflector

Nepal-appeal

Nepal: Please Join my action to raise money for people
sleeping rough in Nepal following the devastation of the Earthquake. Please donate just 10-30 GBP/
15$ to 45 $ Why not take 2 min to do it now?

Learning Alias sponsors the Education of children in Nepal. But right
now we need to raise money quickly to send to her village Khiji Chandeshwori, which is in the foot
hills of Mount Everest. 7 homes in this small village 2 days walk from the nearest road, have need
completely destroyed and the families are sleeping under plastic in the rain and cold. However much
is collected up to 1000 GBP ,LearningAlias will double. Thank You for your kindness, graham
bullock.

Making a Front Side Lamp Reflector Autdesk Alias

I started by making a proflie curve in the Front view and then projecting it onto all the surfaces that converge at the front corner of my carOnce I have trimmed out the opening I build a Draft surface back along the X axis from all the surfaces involved in the aperture.

Intersecting the draft surfaces

The draft surfaces form a tube and I intersect this tube with a planar surface and then trim the planar surf. and the draft surfs. to close off the basic reflector shape. Probably this is the moment you should attach a construction plane set to Geometry, as from now on I needed to see the back surface in true view and not in world space.

Pulling the individual reflector depressions

I needed 3 depressions, so I made a square from key Line curves and copied and pasted to create the 3 squares.Next I projected the squares onto the back surface of the reflector, built 3, 5 degree square surfs. with 4 spans in the U and V. This makes sure that you have a centered CV in the hull.

Cut It Out

Once I had the 3 squares, I trimmed out the surface behind them from the planar surf.

Using the Proportional Modification Control

I used this tool with NUV mode selected to pull out the depressions in the parent surf.

Generating Material Thickness

Most of the time I do this by setting all my surfaces with their normal in the same orientation< Surfaces<set surface Normals. and the I use the offset tool to build my inner offset surface. In this model I have trimmed back the inner surf by 5mm to create a rebate for the gasket.[slickr-flickr tag=”sidelamp”]________________________________________________________________