Taking On a Difficult Audi A5 Fender Top in Alias Studio
>
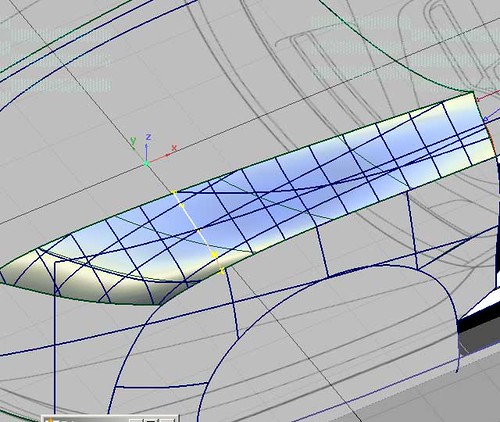
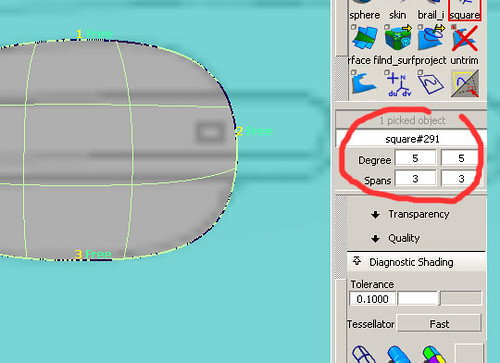
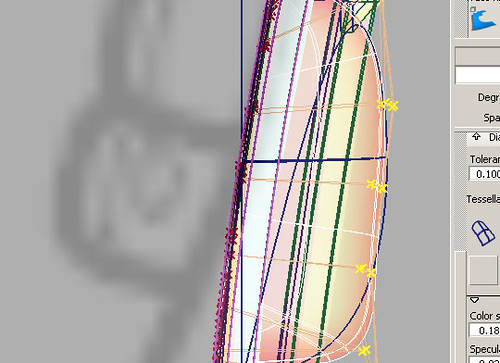
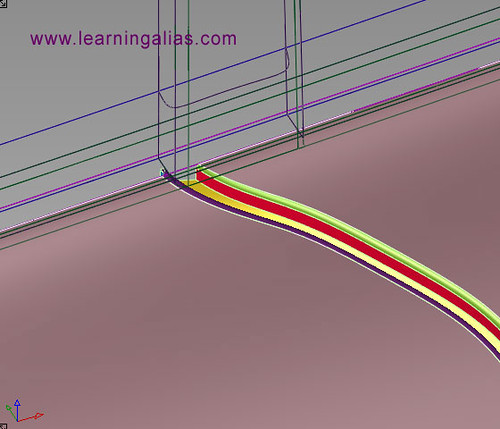
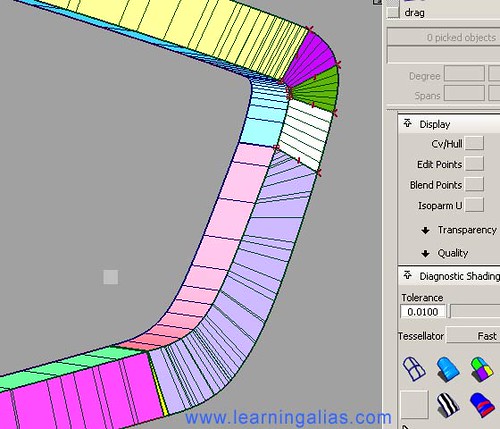
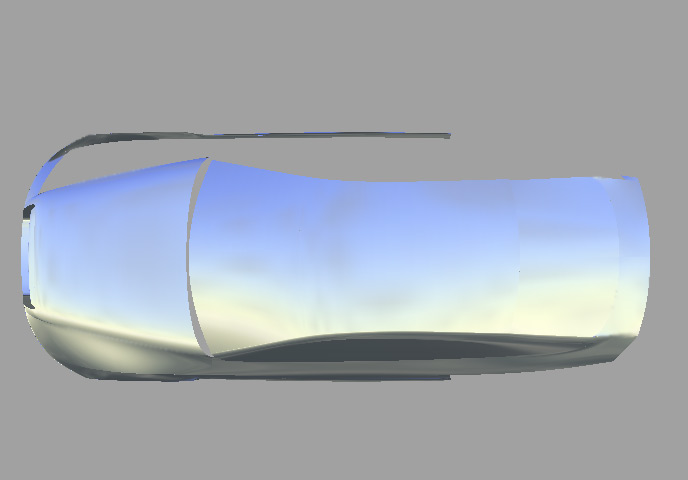
Here we are looking at my students attempt at building a very tricky Audi A5 fender. It is too “bellied (too fat)” from the highlighted crv forward. This is because she has tried to do too much with 1 square surf. I decided to rebuild the surf. First I selected the surf and applied the X-sect tool set to 5-5-5.Next I selected the x-sect crv where the square starts to belly. In the Control Panel I reduced the crv from 3,72 down to deg 3 , 2.
>
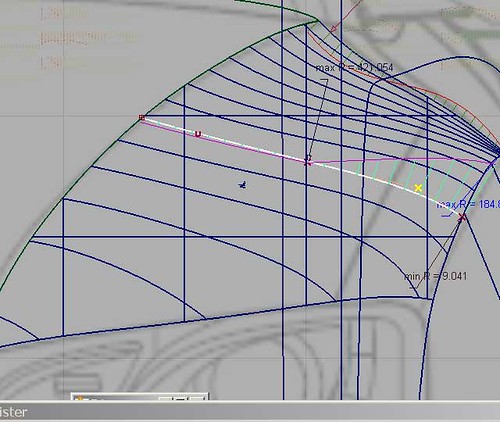
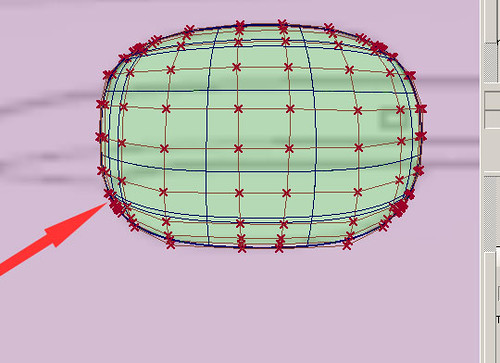
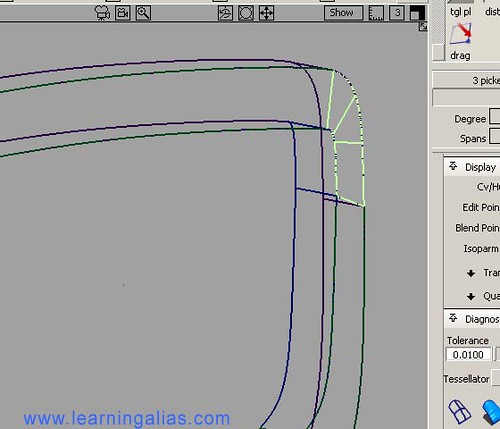
I then deleted the surface gave the highlighted crv a better, flatter x-sect. and built 2 surfs instead of the original 1
>
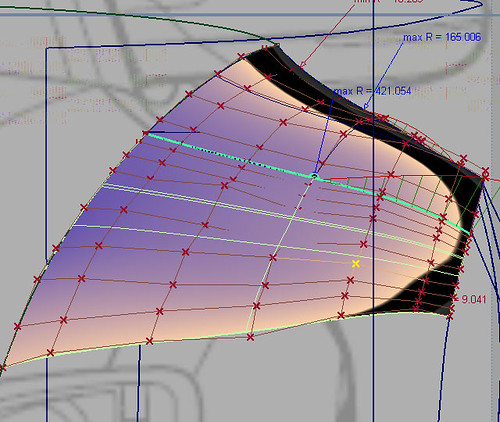
All that was left to do was
1) delete the X-sects2)Insert 2 extra rows of CV’s into the edge of the front sq.surf. to allow me to get G2 with the Align tool3) Freehand model both surfs a little to achieve better highlight flows.4) Send the .wire and these pics. plus explanations to my online student.
To Learn Alias Automotive to Industry Entry level has been made easier.
For student’s who have the objective of finding a CAD job in the near future, I still teach One to One students and all of these students get Automotive Modeling or Design/Modeling jobs, so it’s a great investment to make. The hourly rate is very high and there are vacancies in UK. France, Germany, Sweden, Spain, USA, Brazil etc. I can only take a maximum of 5-7 students at any one time. I teach all levels right up to Post Graduates. I have never had a Private student fail to get an Alias Automotive job (Companies include Ferrari, GM, Lotus, Opel, Audi Seat etc. ). If you wish to apply for a place, please email me with all your details. Why not visit my website and take a look for your self?
Over 100 videos on many, many aspects of Learning Pro. Alias
I show you how to build a Complete Audi A5 Sportback (ext.) . Over 50 Videos on that alone !
Info. on Courses:
“Course #1”.
6 Months website access to all website based video tutorials, 167 Euros (215 USD equivalent Sept. 2012)
“Course #2”.
167 Euros (215 USD equivalent Sept. 2012) per month. You get your .wire reviewed by me every 15 days and you will receive : feedback, instruction, tips and advice from me personally. Access to all videos including my ” Private Student Training Videos”. You will build at least 3 complete automotive exteriors. The course also includes an intensive Reverse Engineering section, which required by most employers.
“#3 Full Pro. “Elite” Course”.
Fast Track Full Pro. “One to One” Course with weekly reviews and coaching 200-250 Euros (USD. 260-320 approx. Sept. 2012) per month. One to One Private tuition. You will receive specific geometry and meshes and modeling from me personally where required, to help you to complete your exteriors quickly to an Industry entry level standard. This means a bigger investment, but once in an Alias modeling job you will get back what you invested many times over and be able to work anywhere in the world
NB: Typically students pay 50% of the cost of the “Elite” course by monthly installments settling the balance over time, once they have an Alias Automotive contract.
*** Special 25% Discounts for US students (Message me on my website for details)
USA:
If you are in the USA, just register and login, then go to Profile and you can pay your subscription with your US credit card. Absolutely no extra charges for currency conversion.
Please donate just 1 Eur/1.3 USD. Why not take 2 min to do it now? Learning Alias sponsors the Education of children in Nepal. This is Deepana and we need to raise money to put her through Nursing College in Kathmandu. Learning Alias Blog is a free service, but if you would like to show your appreciation, please make a small donation. 100% of your money will go directly to pay Deepana’s college fees. Without the help of sponsors in the developed world, Deepana would receive no education whatsoever, as she comes from a remote Hymalayan village. Thank You for your kindness, graham bullock. PayPal or Credit Card. NB: US Credit Card accepted
Pictured below is an Audi A5 Sportback built by one of my students who is now a Digital Sculptor for GM.
Full HD video, just click the picture below
I am now putting some of my tutorials on YouTube, so whilst you’re there you may wish to check them out. There’s a full tutorial on how to create a Ball Corner to Class A Surfacing, Catia V5 spec.
You can now watch ALL my Video Tutorials on a state of the art, purpose built website.
For student’s who have the objective of finding a CAD job in the near future, I still teach One to One students and all of these students get Automotive Modeling or Design/Modeling jobs, so it’s a great investment to make.
Many of my students make it to the top and succeed in becoming pro. Alias Digital Modelers. The hourly rate is very high and there are vacancies in UK. France, Germany, USA, Brazil etc.
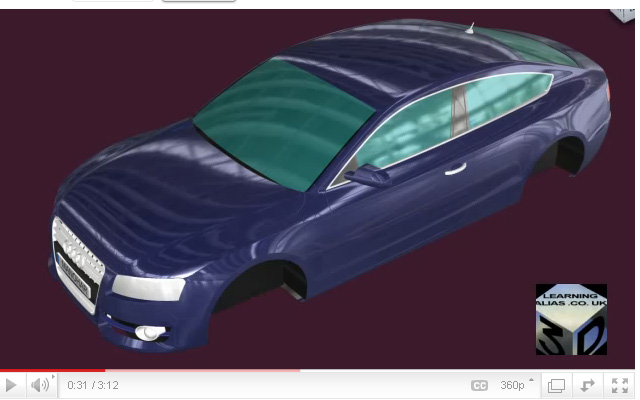
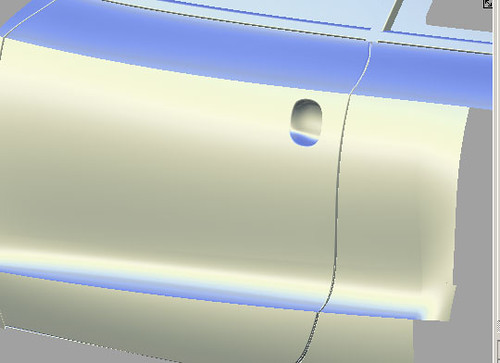
I’ve built a beautiful door and it seems a shame to cut into it,
but that’s the nature of car design mostly this would be detailed enough to be sent off an milled out in clay for further Styling shows and further development and in fact often even the shut lines are not required, as if any changes are required to the body side or hood top, the first thing the clay modellers will do is fill in the shut lines. However if you’re modelling for a later stage of the design process, details like door handles may be required
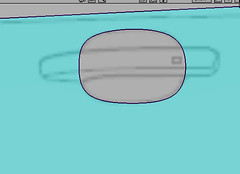
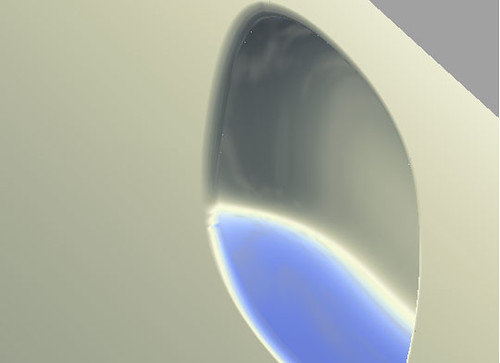
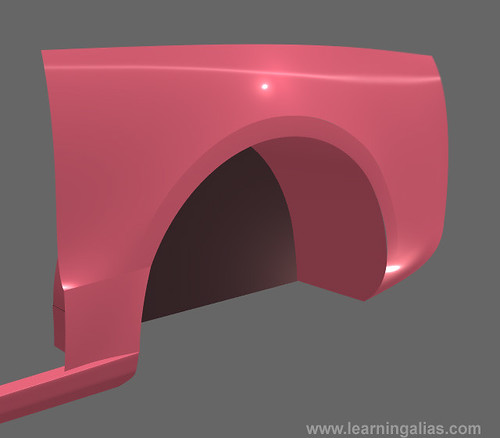
Today I am going to show you one method for modelling a depression into the door,
as part of the door handle set up. If you are building a complete exterior the chances are that details like door handle depressions would be added for aesthetics and exact dimensions wouldn’t be required. The accurate modelling would be done at a later stage on a panel by panel basis. So our task is to get the periphery right and not worry about tight dimensions beyond that. Usually it would be the clay dept. who put the fillets around our depression, but today I’ll show you a way of doing that job too.
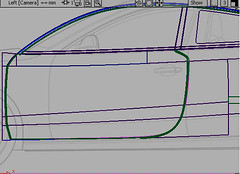
Select just the surfs. that you need and make everything else invisible (hide unselected)
Get right up close
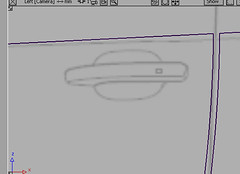
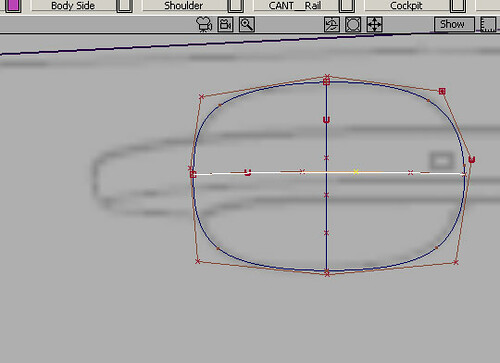
Place a circle in the middle of the depression
and using Non-Prop scaling and then Move Cv match your curve to the outline on the canvas plane
Attach 2 deg 5 curves across the axes
Helper Curves
In the Top view pull out the first curve to meet the Stylists dimensions approx. Then improve the accuracy with the Move CV tool.Now do the same on the second crv. in the back view
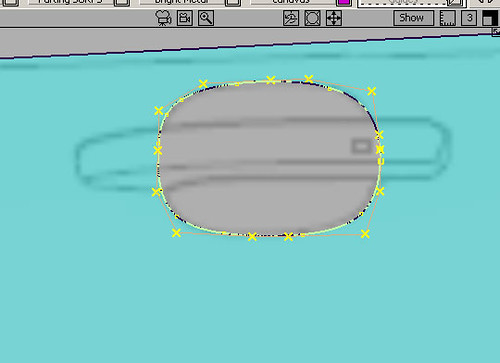
Using your circular curve trim discard and create the hole
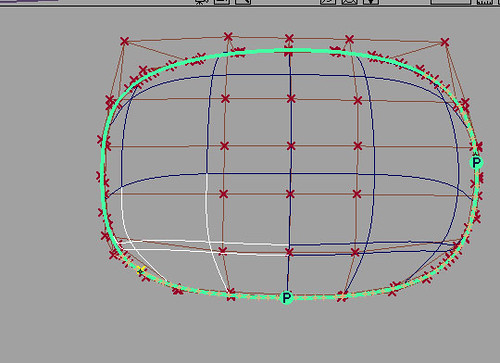
Place a rebuild crv. on the trim edge (set to reduce spans)
I’m pushing my luck a bit here using only 15 or so CV’s. You could use 20 to be safe>Object Edit>Detach the rebuild crv in four corners to create 4 curves for the operation of the Square Surf. tool
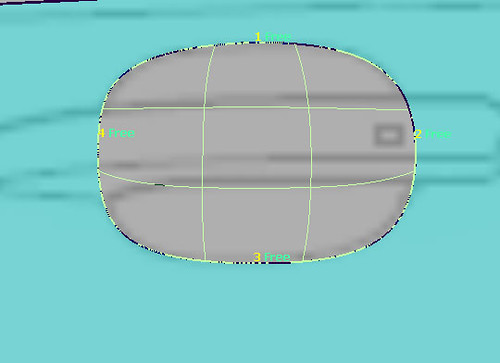
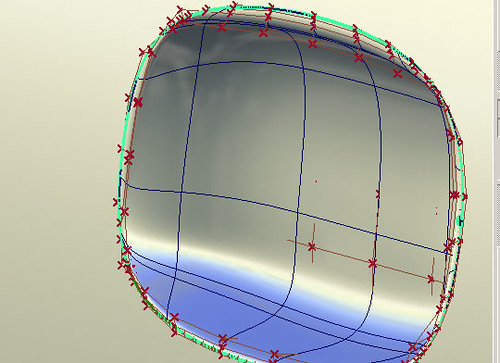
Build a square surf.
I’ve made mine 5,5,3,3 to keep it flexible enough to allow me to do some serious pulling on the internal CV’s
>Object Edit>Insert and insert an extra 2 rows of Cv’s as close to the boundaries as possible
This is to ensure that we don’t loose GO once we start radically yanking at the internal CV’s
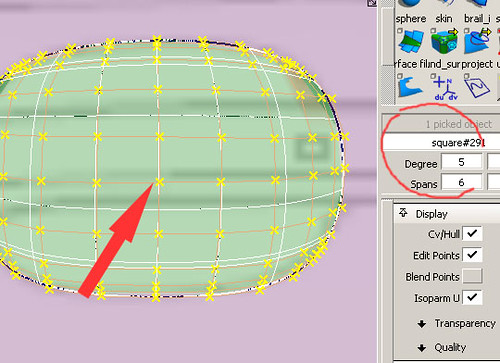
In the Control Panel I have added an extra Cv in one direction,
as I want to pull from the center of the depressionYou may want to use less spans, that’s OK but you need to end up with a central CV
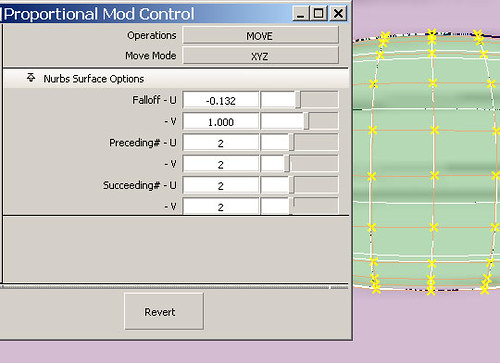
You can see how I have set up the Proportional Modification Control to best deform the surface into a soap dish depression
My graphic shows Move Mode as XYZ, but actually I used NUV as we are in local geo.This tools requires an ocean of practise if you want to be able to use it quickly and efficiently
In the Back view pull out the central Cv until the surf at that point meets the helper crv.
Top View: Adjust your amount of in/out pull
to the left and right it’s obvious that the dish is not the same profile as the helper crvs, so pull the CV’s Move CV with the appropriate axes restrained until you get a good fit. This is really hard at first, but with prctice you get good at it
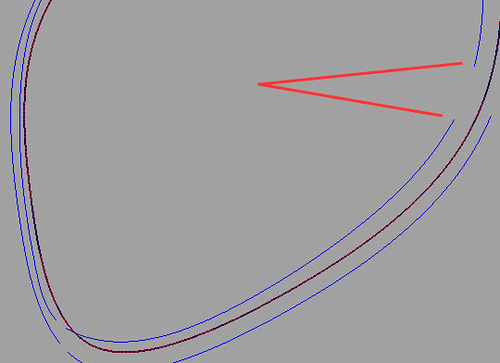
Red lines are pointing to the helper crvs.
It’s absolutely vital to maintain GO (position at the surf. boundaries)
If you don’t have GO then try to recover with the Align tool, but you may have to delete the surf. and start again
OK here I’m pulling the last 3 rows of CV’s so that they appear underneath the locators.
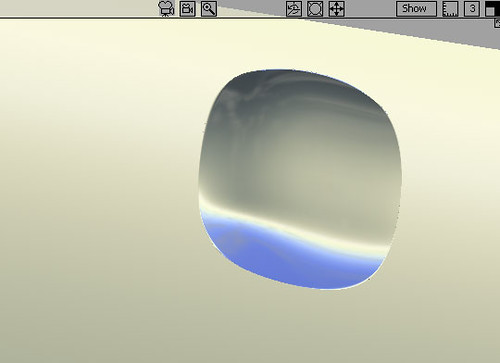
I’m doing this because if I don’t I wont havea good angle of intersection for building a fillet This is what we’ve achieved so far and this is good enough to go to be milled in clay or polyester
Tubular Flange Control
I’ve run a tubular surf all the way around, but where my trim edge is fragmented I am going to show you how to repair the C-O-S, because you need to know how to tweak them. It’s a big part of Alias Studio Modelling.
In real life I don’t have time to do this extra work,
so I would un-trim the aperture and recover the unbroken C-O-S that we started out with. I would then run the Tubular Flangeraround that and then Intersect it with both the depression and the door skin and then trim and delete the center surf. again
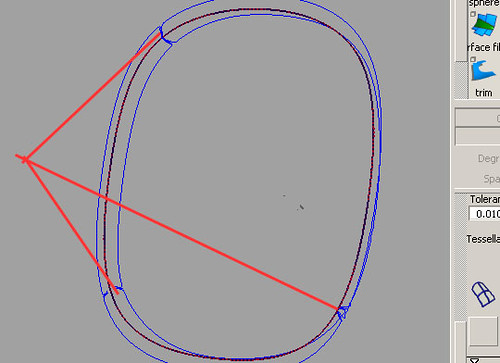
I repaired my C-O-S as follows:
Detach tool to get rid of the broken bitsJoin up the ends with deg. 5 crvs>Object Edit>Align Tool to align the 8 deg 5 crvs with the C-O-SProject normal set to 0.001Delete the 8 deg 5 crvs_______________________
OK: back to the standard work flow!
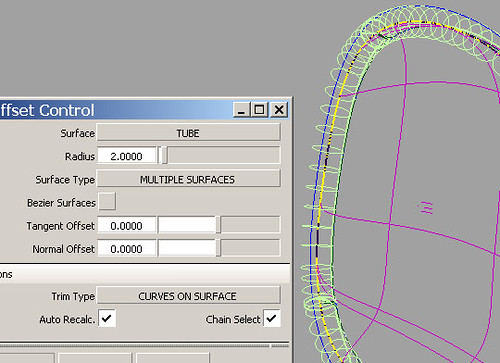
Next I ran the Free Form Fillet control around. If you have good clean continuous C-O-S then choose the Single Surface optionBecause I did all this repair work on my C-O-S, I used Multiple SurfacesI could explain all the ins and outs to you, but the best way to learn how these Alias Tools function, is by trying both workflows
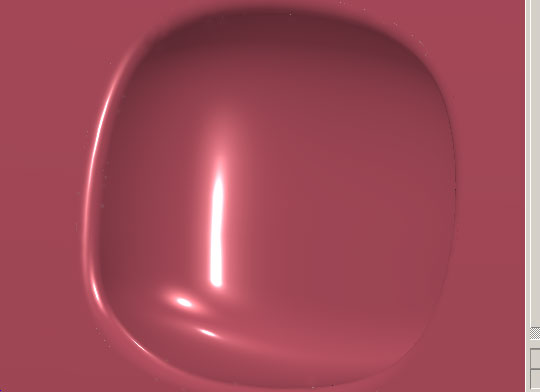
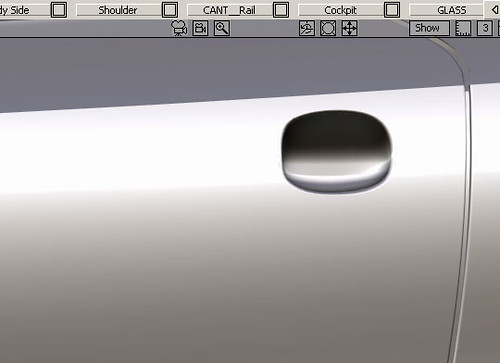
Once I’d built the fillets I manually trimmed. I think it’s looking good. I hope you agree
This is the bit that all Alias Studio Modellers love the most, crank the Rendering Controls up to Max and
then sit back and enjoy your own work
Hmmmm! Needs a lick of paint
Here it is with Shader Anti Alias on High and Showroom Diagnostics turned up high
To Learn Alias Automotive to Industry Entry level has been made easier.
For student’s who have the objective of finding a CAD job in the near future, I still teach One to One students and all of these students get Automotive Modeling or Design/Modeling jobs, so it’s a great investment to make. The hourly rate is very high and there are vacancies in UK. France, Germany, Sweden, Spain, USA, Brazil etc. I can only take a maximum of 5-7 students at any one time. I teach all levels right up to Post Graduates. I have never had a Private student fail to get an Alias Automotive job (Companies include Ferrari, GM, Lotus, Opel, Audi Seat etc. ). If you wish to apply for a place, please email me with all your details. Why not visit my website and take a look for your self?
Over 100 videos on many, many aspects of Learning Pro. Alias
I show you how to build a Complete Audi A5 Sportback (ext.) . Over 50 Videos on that alone !
Info. on Courses:
“Course #1”.
6 Months website access to all website based video tutorials, 167 Euros (215 USD equivalent Sept. 2012)
“Course #2”.
167 Euros (215 USD equivalent Sept. 2012) per month. You get your .wire reviewed by me every 15 days and you will receive : feedback, instruction, tips and advice from me personally. Access to all videos including my ” Private Student Training Videos”. You will build at least 3 complete automotive exteriors. The course also includes an intensive Reverse Engineering section, which required by most employers.
“#3 Full Pro. “Elite” Course”.
Fast Track Full Pro. “One to One” Course with weekly reviews and coaching 200-250 Euros (USD. 260-320 approx. Sept. 2012) per month. One to One Private tuition. You will receive specific geometry and meshes and modeling from me personally where required, to help you to complete your exteriors quickly to an Industry entry level standard. This means a bigger investment, but once in an Alias modeling job you will get back what you invested many times over and be able to work anywhere in the world
NB: Typically students pay 50% of the cost of the “Elite” course by monthly installments settling the balance over time, once they have an Alias Automotive contract.
*** Special 25% Discounts for US students (Message me on my website for details)
USA:
If you are in the USA, just register and login, then go to Profile and you can pay your subscription with your US credit card. Absolutely no extra charges for currency conversion.
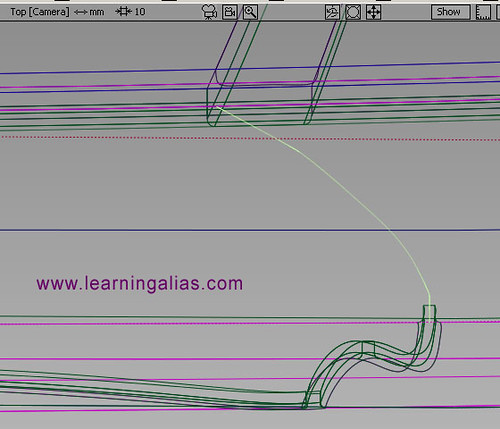
First project a COS at the center of the intended parting line. Do the door in the Right view and then in the Top view make and position a projection curve which matches the end of the previous projected curve.
TIP: Mark the top end of the center COS at the top of the door (Right view) with a Construction Point and then make sure that your next COS in the tpop view marries up with it.
Tip: If after projecting the second curve, it fails to connect exactly with your first curve, just move the CV’s of your projection crv. and the COS will update using dirrect history. This is one of the miricals of Alias.
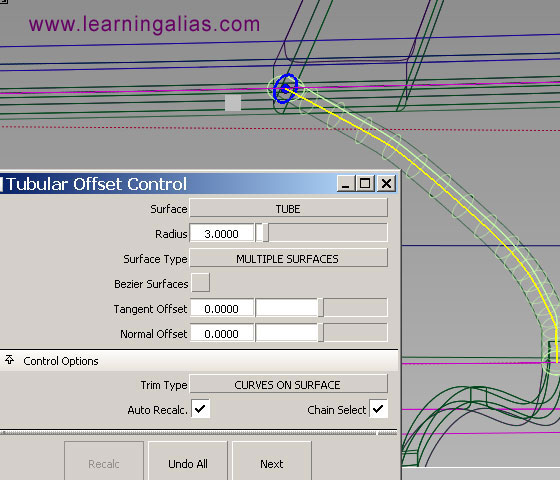
Tubulat Offset Control. Use this tool to create COS (R= 3) as soon as you have produced the tube surf you can delete it, as all we require are the 2 outboard COS that this process creates. The center COS you can now also delete
OK things should look like this!
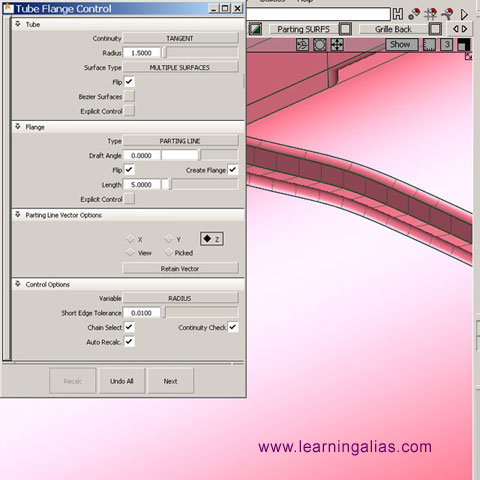
Tube Flange Control set to create fillets R= 1.5 mm. and flange depth = 5 mm.
Tubular Flange Control. Click the first outboard COS and wait for the tool to build the Filet and Flange. This is the shoulder of my Audi A5, so I have checked the Z Vector option, as I require my Flange to build downwards.
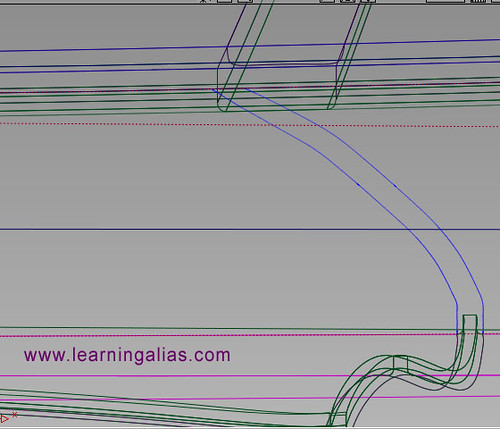
Once you have built both sides of your Parting Line you will need to trim out the part of the original surf. which is covering your new creation.
Here we can see all the surfs. that comprise the Parting line i.e. Skin surf at the bottom to close the model and then on the left and right a fillet and a flange
Should look a lot like this!
Everything looking as it should, in Autodesk Alias Studio 2010
Pictured below is an Audi A5 Sportback built by one of my students who is now a Digital Sculptor for GM.
Full HD video, just click the picture below
I am now putting some of my tutorials on YouTube, so whilst you’re there you may wish to check them out. There’s a full tutorial on how to create a Ball Corner to Class A Surfacing, Catia V5 spec.
You can now watch ALL my Video Tutorials on a state of the art, purpose built website.
with contract modeling, teaching one to one students from all 5 continents and now of course my brand new website has gone live and it is possible to learn Alias Automotive to a professional level for the lowest rate on the planet.
Pictured below is an Audi A5 Sportback built by one of my students who is now a Digital Sculptor for GM.
Full HD video, just click the picture below
I am now putting some of my tutorials on YouTube, so whilst you’re there you may wish to check them out. There’s a full tutorial on how to create a Ball Corner to Class A Surfacing, Catia V5 spec.
To Learn Alias Automotive to Industry entry level has been made easier.
For student’s who have the objective of finding a CAD job in the near future, I still teach One to One students and all of these students get Automotive Modeling or Design/Modeling jobs, so it’s a great investment to make. The hourly rate is very high and there are vacancies in UK. France, Germany, Sweden, Spain, USA, Brazil etc. I can only take a maximum of 5 students at any one time. I teach all levels right up to Post Graduates. <I have never had a Private student fail to get an Alias Automotive job (Companies include Ferrari, GM, Lotus, Opel, Audi Seat etc. ). If you wish to apply for a place, please email me with all your details. Why not visit my website and take a look for your self?
Over 100 videos on many, many aspects of Learning Pro. Alias
I show you how to build a Complete Audi A5 Sportback (ext.) . Over 50 Videos on that alone !
Info. on Courses:
“Course #1”.
6 Months website access to all website based video tutorials, 167 Euros (200 USD equivalent Nov.2011)
“Course #2”.
167 Euros (200 USD equivalent Nov.2011) per month. You get your .wire reviewed by me every 15 days and you will receive : feedback, instruction, tips and advice from me personally. Access to all videos including my ” Private Student Training Videos”. You will build at least 3 complete automotive exteriors. The course also includes an intensive Reverse Engineering section, which required by most employers.
“Course #3”.
Fast Track Full Pro. “One to One” Course with weekly reviews and coaching 250 Euros (USD. 300 approx. Nov. 2011) per month. One to One Private tuition. You will receive specific geometry and meshes and modeling from me personally where required, to help you to complete your exteriors quickly to an Industry entry level standard. This means a bigger investment, but once in an Alias modeling job you will get back what you invested many times over and be able to work anywhere in the world
If you are in the USA, just register and login, then go to Profile and you can pay your subscription with your US credit card. Absolutely no extra charges for currency conversion.
Hi, Today I’m going to show you an easy way to quickly model in your side glass Trim using C_O_S projected onto the glass.
Often my students get into a mess trying to do this, but if you organize your workflow, put the glass and the trim on their own separate layers and then hide everything else away it suddenly gets a lot easier. The real secret though is to use your side glass surf and project all your trim crvs. onto it.
My New Website is now live!
I am a top flight Alias Trainer/Modeler, specializing in taking students who are either currently studying or who have left college/university and want to learn the skills they need to reach Alias Automotive Entry Level. I offer the best Alias training deal on the Planet!
Fees: Accsess to all my 200+ videos, including the complete Audi A5 Sportback, my Virrage concept car and many other projects
Fees include regular feedback on your work with comments, tips and advice from me www.learningalias.co.uk
or you can apply for a place with me as a One on One student,
which means a bigger investment of 339$ / 250 Euros pcm. but once in an Alias modeling job you will get back what you invested many times over and be able to work anywhere in the world
I can only take a maximum of 5 students at any one time. I tech all levels right up to Post Graduates and Alias modelers in their first year in Industry. I have never had a private student fail to get an Alias Automotive job (Companies include GM, Lotus, Opel, Audi Seat etc. )
If you wish to apply for a place, please email me with all your details.
Kind Regards
graham bullock B.Ed. Des & Tech.Pro. Modeler & Alias Trainer
Professional Alias Trainer Graham Bullock
Oh! in case you arre wondering what the inner most C_O_S is. It’s for a trim divide to create the obscuration zone
Work out all your dimensions for the Side Glass Trim
Create your projection curves in the Left view.Don’t forget once you have one profile curve you can quickly make the sister crv with the Offset tool. Also works for C_O_S.
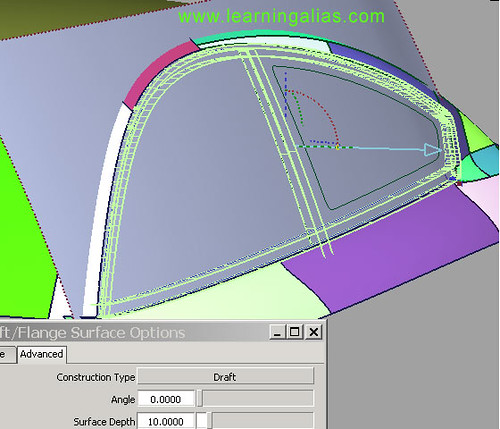
Bring out surfaces from the side screen along the Y axis using the Flange tool
set to Y and Depth 5mm or whatever your model demands. I have use 10mm here to make things easier to see.
Pick all your side glass trim and assign it to a layer.
Assign your glass to a separate layer and after making them both invisible use >Object Display >”hide unselected” to hide everything else from the scene”
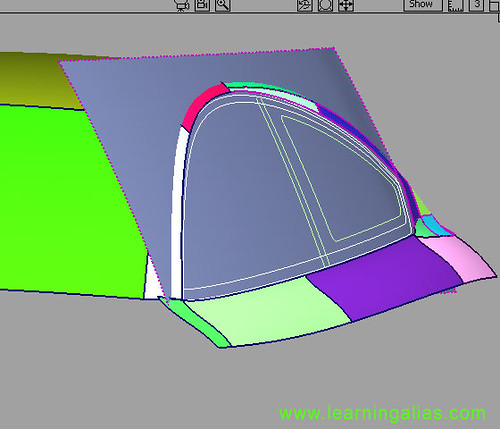
Build skin surfs. to complete the basic screen furniture.
At the tight corner I had to trim divide the draft surfs. so that I could build 1 small vertical skin surf without it going out of control on me. It’s the lilac hockey stick shaped surf. Above then I built the white Sq. using 2 deg crvs. and the same for the 2 radial sq. surfs. (green and purple)
Important Note:
Skin and Draft surfs. and a lot of weight to your file, as they create so many spans. At a more Pro. level if you have time, you use Sqauare and Bi-Rail surfs. set to Explicit Control to keep the surfs as light as you can
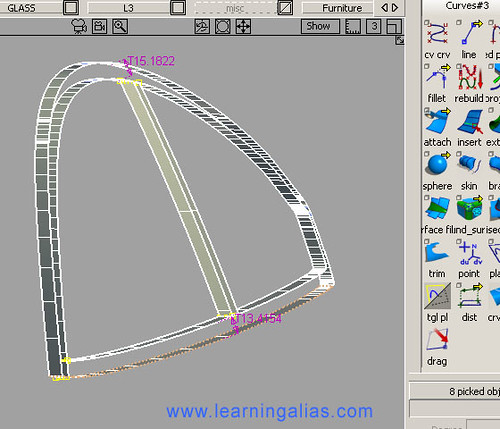
Here they are the 3 Sq surfs.
Important all surf. boundaries must have “G0”, if not you won’t be able to create the vital fillets. The fillets used here are R=2.5 mm
Usually I am not required to build side glass trim, but sometimes a designer wants all the detail on the model for presentation
to the decision makers within the company.
The method I have shown you is a quick way of Alias Studio modelling Side Glass furniture.
It’s a great method when the project is in its early syling stages and showing the e3xact production cross section is not demanded
When required to model to production spec.
I have to create accurate generation crvs and make each run of the trim individually and then it’s a far more demanding task, but this system is great for those of you learning Alias Studio Automotive Modelling and it’s also great when a Stylist wants to see the side glass trim in quickly to get the overall view of how the trim is helping to describe the 3D form of the vehicle.
Cheers
graham
_<span style=”font-size: 13px; font-weight: normal;”><a title=”New_Site_Blog_img by grazy1949, on Flickr” href=”http://learningalias.co.uk/”><img src=”https://farm6.static.flickr.com/5210/5364155015_1cacf998a8_o.jpg” alt=”Go to Learning Alias” width=”640″ height=”480″ /></a></span>
Pictured below is an Audi A5 Sportback built by one of my students who is now a Digital Sculptor for GM.
Full HD video, just click the picture below
I am now putting some of my tutorials on YouTube, so whilst you’re there you may wish to check them out. There’s a full tutorial on how to create a Ball Corner to Class A Surfacing, Catia V5 spec.
For student’s who have the objective of finding a CAD job in the near future, I still teach One to One students and all of these students get Automotive Modeling or Design/Modeling jobs, so it’s a great investment to make.
Many of my students make it to the top and succeed in becoming pro. Alias Digital Modelers. The hourly rate is very high and there are vacancies in UK. France, Germany, USA, Brazil etc.
The level of design of Audis is very sophisticated
and it is impossible to make a model that accurately captures the full level of the styling, without having a physical reference.
This is how an Audi AG. Alias model would build it.
He/she would also have to have regular sessions with the Stylist, both sitting at the work station. In these daily or twice daily sessions the Stylist would explain exactly what should be happening to various complex surface forms e.g. around the highly detailed front end: grilles, spoiler and lights. Also the exact form of the “C” pillar and blend to the shoulder.In addition to the stylist input, the Alias Modeller would have a clay model to refer to and he would look at the model, make sketches, take templates to get the cross section of the shoulder etc.He/she would spend a LOT of time studying the clay model.
Simply put this info is not on the Canvases and even photos. don’t shown the subtlety of the surfaces.
TIP: When modelling the cockpit sides and establishing the inner shoulder line:
Make a really accurate side glass (Be very careful to get the vert. and horiz. curvatures spot on. On the A5 the side glass accelerates inwards towards the C pillar. Don’t miss this subtlety.)Create the side glass in line with the sheet metal. NOW you can treat the side glass as though it were part of the body and build to it.When you have finished building the entire cockpit, including the C pillar and blend to shoulder, you can then Offset the Side Glass inwards by 5 – 10mm to the correct position for the glass.
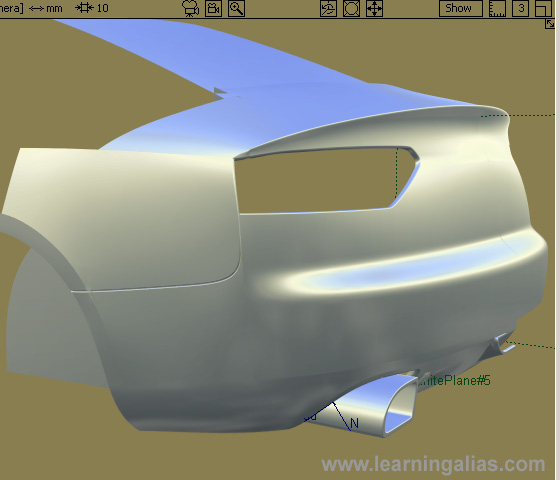
This model has reached the stage where it has all the main surfs. established, but without the detail. This stage of modelling is referred to as a Slab Model and is sometimes required to reverse model back into a 1:5 or 1:1 Clay or Hard model. This level of Alias modelling would be used by a lot of manufacturers. However for a prestige car a lot more detail would have to be modelled before the file could be transmitted.
The side glass and rear Glass have been pushed in “Offset” by 10 mm, this saves the physical modellers a lot of unnecessary work.
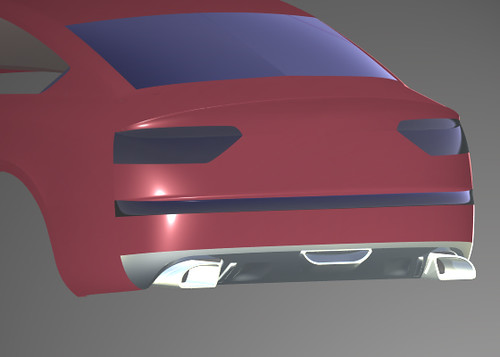
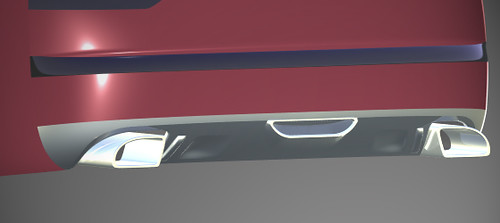
More work has been done on the Rear Apron. Most manufacturers see this as just a piece of bent metal, but Audi started to input design into this component back in 2000/2, with the advent of the Audi All-road. A strong Audi styling feature is the panel around the twin exhausts tail pipes and the seductive form of the tail pipes themselves. When you are driving behind a top of the range Audi, you’re aware, that it’s a piece of dynamic sculpture, a lot more than just a car!
At the top end of the price range the Audi has a lot of architecture around the rear apron and exhaust tail pipes. Every part of this car gets aesthetic consideration. Also the rear apron and exhaust panel are ver aerodynamic.
This aluminium panel covers the otherwise unsightly exhaust pipes, but the tail pipes get the design treatment
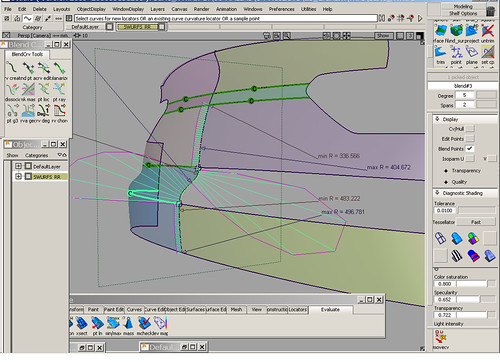
To model the G3 blend which Audi require, between rear end sheet metal and bumper, all the relevant panels have been assigned to a single dedicated layer. This allows the modeller to work in an uncluttered environment. Also as success is reached at each stage of modelling the rear end surfs, the wire is “saved as” with an updated suffix, then the modeller continues to work on the NEW file. Personally, if I really mess up, I go back to an earlier save and export/import the replacement surf. I need.
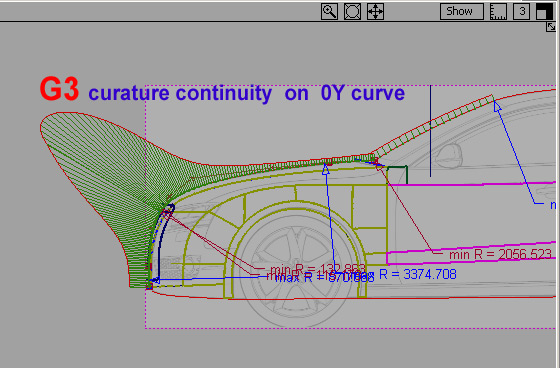
OK! the problem here is that there is a BIG elegant double inflexion crv. at the Y=O, but it has to fade to the normal bodyside curvature at the corner of the car. HOW TO: Set a const.pl. in world geom. at Y=O and then align a blend curve to the plane. Using the blend crv. manipulator set to G2 (CV ON and Always use a curv. comb). Used G2 for the bumper and G3 for the upper blend and finally, build a square to form the surface. There is a complete step by step tutorial on building an A5 available on my website:
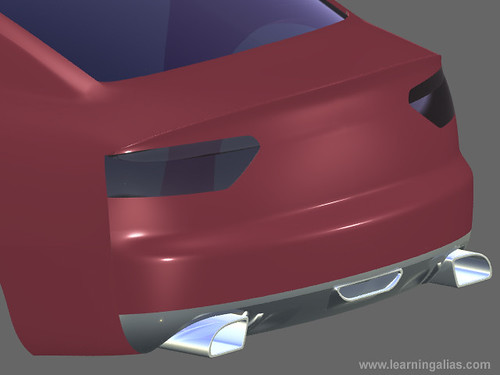
In this pic. look at the surface conflict between spoiler and rear end sheet metal. The student had to trim it out and build a free form blend. The double curvature at the top of the bumper has worked out well. It has been kept sharp, but the real car has a softer curvature beneath the rear lamp you can see a tangent break. If there is no parting line going in there, a transitional blend surf. will need to be created.
A lovely shot of the C pillar. A very complex piece of modelling on the A5. There are no “make your life easy” tangent breaks/parting lines or appliques to hide lack of G3. It’s an Alias nightmare, but it’ll be in my tutorial. If you look carefully, you can see that the glass is all set in “Offset” 10 mm. Without the offset it would be impossible to resolve the C pillar modelling problem
Once again the A5 uses a really tricky set of surfaces for both fenders. There are n o helpers, like parting lines or features to break up the problem. You are in the world of seamless G3 curvature. The first time I built the side of the fender with, just 7 squares 5,5,1,1,. Having built onto a deg. 3 curve matrix, using direct memory, I was able to get good curvature by pulling the CV’s of the crvs. using Move CV, set to Step size = 0.001 XYZ. However as good isn’t good enough for Audi, I went on to build Free form Blends at several surf. boundaries in order to achieve an either higher standard. There are still some surfacing problems to iron out on this student’s model though
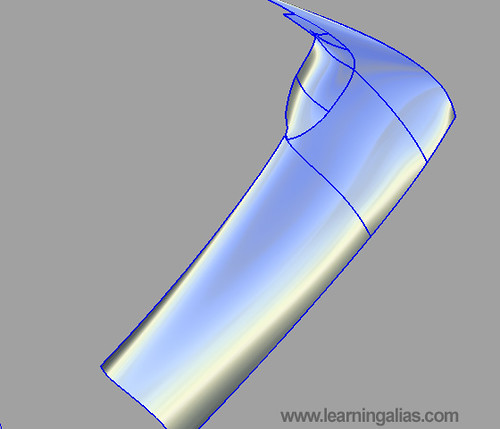
Rendered up and looking good “The Fender”, just one small part of an entire model______________________________________________________________________
Fast forward————–
The rear end is now nearing completion. There are areas where the surfs. can be improved. The next A5 this student builds she’ll know where the really difficult problems lay and be able to create really good curves to build her surfs. from
Alias Studio Parting LinePictured above is a 3 mm parting line. That’s the root width. Measured across the opposing points of tangency the overall width = 7 mm.This would be the spec. on an Audi, but some low priced vehicles have much wider and less consistent parting lines. Putting in the parting lines on a model is not at all easy and requires a lot of practice and experience. I always consider where the parting lines will be when I am planing out patch layouts at the early stage of the model. In the case above I joined my vertical surface boundaries on the center line of the sheet metal spot weld joint.
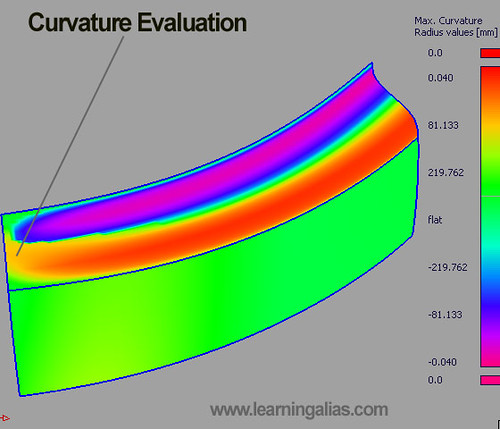
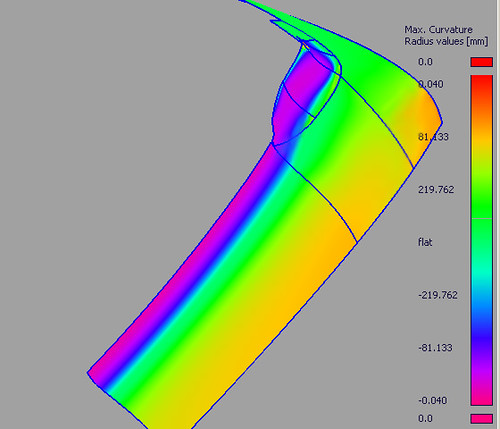
Rear Bumper and double curvature blend surfaces – The Alias Studio Curvature Evaluation tool is invaluable when we need to see exactly what our surfs. are doing. Where they are good and where they need some intensive care. Here the line points to an orange area where the double blend surface washes out into the body side. This is a problem, as where this surf meets the body side it must have lost all its double crv feature. Some careful CV tweaking is required
Rear Shoulder and C pillar blend. Curvature Evaluation tool shows us clearly how the highlights will run along the shoulder.The shoulder is a Secondary surfaces and thus we must make sure that its curves are perfect before building. If the curves are only 95% correct, then the chances of getting good highlights without time consuming direct modelling, has already been lost. The blends however are tertiary surfs. and thus can be deleted and replaced by new surfs
I am pleased with the way the highlights are running,
but if I am going to be honest, I can also see that the far corner of the shoulder has been affected by a small problem with the 3 curves accelerating too much at their ends. You can see the dark area at the corner, which is showing the defect. These type of problems MUST be spotted early on, before any dependant (child) surfs are built on, thus compounding the error. She corrected this by editing the end of the curve
Enjoy your Alias
To Learn Alias Automotive to Industry Entry level has been made easier.
For student’s who have the objective of finding a CAD job in the near future, I still teach One to One students and all of these students get Automotive Modeling or Design/Modeling jobs, so it’s a great investment to make. The hourly rate is very high and there are vacancies in UK. France, Germany, Sweden, Spain, USA, Brazil etc. I can only take a maximum of 5-7 students at any one time. I teach all levels right up to Post Graduates. I have never had a Private student fail to get an Alias Automotive job (Companies include Ferrari, GM, Lotus, Opel, Audi Seat etc. ). If you wish to apply for a place, please email me with all your details. Why not visit my website and take a look for your self?
Over 100 videos on many, many aspects of Learning Pro. Alias
I show you how to build a Complete Audi A5 Sportback (ext.) . Over 50 Videos on that alone !
Info. on Courses:
“Course #1”.
6 Months website access to all website based video tutorials, 167 Euros (215 USD equivalent Sept. 2012)
“Course #2”.
167 Euros (215 USD equivalent Sept. 2012) per month. You get your .wire reviewed by me every 15 days and you will receive : feedback, instruction, tips and advice from me personally. Access to all videos including my ” Private Student Training Videos”. You will build at least 3 complete automotive exteriors. The course also includes an intensive Reverse Engineering section, which required by most employers.
“#3 Full Pro. “Elite” Course”.
Fast Track Full Pro. “One to One” Course with weekly reviews and coaching 200-250 Euros (USD. 260-320 approx. Sept. 2012) per month. One to One Private tuition. You will receive specific geometry and meshes and modeling from me personally where required, to help you to complete your exteriors quickly to an Industry entry level standard. This means a bigger investment, but once in an Alias modeling job you will get back what you invested many times over and be able to work anywhere in the world
NB: Typically students pay 50% of the cost of the “Elite” course by monthly installments settling the balance over time, once they have an Alias Automotive contract.
If you are in the USA, just register and login, then go to Profile and you can pay your subscription with your US credit card. Absolutely no extra charges for currency conversion.
Pictured below is an Audi A5 Sportback built by one of my students who is now a Digital Sculptor for GM.
Full HD video, just click the picture below
I am now putting some of my tutorials on YouTube, so whilst you’re there you may wish to check them out. There’s a full tutorial on how to create a Ball Corner to Class A Surfacing, Catia V5 spec.
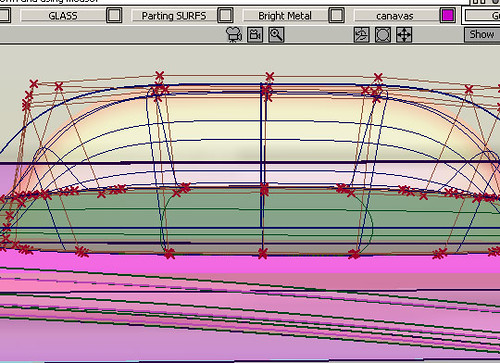
This is a typical comment from someone who has spent 3 years learning Alias as part of a Product Design Course. “I want to build an Automotive Exterior, but I don’t know how to control big surfs. Can you help me?”Ok! You’ve built say an electric drill, a micro wave and a cell phone and you have learned a lot, but nothing about surfacing a car and maintaining Catia V5 surf. boundary tolerances and critically INTERNAL surface Continuity i.e.G3.
“What’s that?”
Ok! Here goes: mastering building surfs. to close tolerances at boundaries is a great thrill, but we need eventually to learn a higher level of skill if we are going to make the center surfaces a car. The above pic. shows G3 curvature conditions between 2 surfs i.e. the hood top and the front surf.The 3 curvature CV rows are not close to the boundaries, but have been SLID manually in towards the center of each surface and this means that the curvature is GENUINLY continuous through the entirety of both surfaces NOT JUST AT THE BOUNDARIES. This is the surface precision demanded in the Automotive Industry and it’s called G3. There is an even higher level called G4.
“Well how do you build it?”
First you must build curves that are as light as possible.Try to use deg 2-3 crvs, but if the surf has a lot going on you’ll have to go up to deg.5 and very occasionally higher, but in all cases try to use only 1 span, both in the U and V.
You can’t build to G3 without spending a lot of time getting elegant , light crvs
and you do this by matching CV’c on opposite boundaries an ALWAYS HAVE THE CURVATURE COMB SWITCHED ON.Move your CV’s with the CV Move tool (bottom of the Control Panel )Set the tool to either XYX or NUV mode and the step size to. o.o1 mm and to o.oo1 mm for fine tuning of the internal Cv’s of a surf.It’s usefull most of the time to constrian the movement of Cv’s to just 1 or max 2 axes.Before launching into hand modelling an internal surface:SAVE OUT YOUR WORK WITH A NEW FILE SUFFIX and then open the new file for the trial attempt.In Industry you are expected to follow file naming protocol, so that everybody who might handle your work will understand you file hierarchy at first glanceHere’s an exampleaudi_a5_hood_top_roof_graham_12c.wireaudi_a5_hood_top_roof_graham_12c1.wireaudi_a5_hood_top_roof_graham_12c2.wireaudi_a5_hood_top_roof_graham_12d.wireIf your files go to a parallel engineering dept, anyone can see how to find stuff in your file hierarchy.An Alias workstation is like a FLIGHT DECK, and when someone else jumps in your chair, they should be able to understand your filing system straight away.
“Tell me more about G3 surf. Integrity?”
Ok! so now you know that changing the surfaces characteristics with Re-Invoke is very useful to lighten surfs. always do this with both surf. boundary indicators on and curv. comb, but to try and improve the interior of surfs. Re-Invoke is just going to load up your surf. with extra geo.
“So what do I do?”
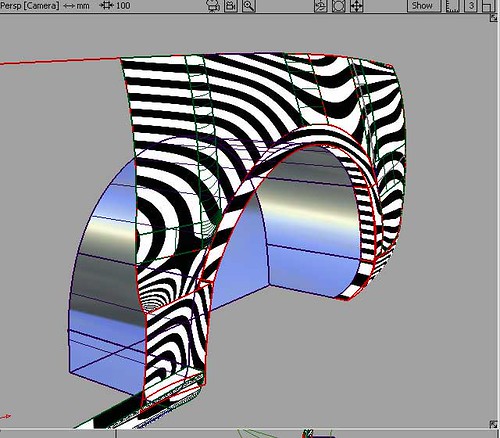
You stat pulling CV’s manually.In conjunction with what I’ve already told you, switch the diag. Zebra stripe on, just on the 2-3 relevant surf. Select them and hit Zebra and then deselect them.TURN THE TRANPARENCY DOWN VERY LOW so that you can easily see the CV’sIf you have built single span surfs. you wont have too many CV’s to pull
Never pull the last 3 rows.
You may slide them toward the surf. int, but NEVER pull them.Watch the surf. bound. indicators all the time.
YOU CAN’T RESOLVE A G3 PROBLEM BY YANKING ON 1 CV,
you must look at 2 or 3 surfs. and see how the Zebra flows across them. Move each relevant CV just a touch and leave your work unsaved until you have improved your Zebra flows to some small degree and then save that change. If you really —- up, and Ctrl+Z fails to get you out of the hole you’ve just created, then just open the earlier version of the file.
Some Rules for G3 Crv. Cont.
To get G3 surfs, you must first build G3 ready curves(I try to use deg.3 crvs with 2 controllable CV’s for manual builds and when I’m using Align tools I use deg. 5 with 1 span, this leaves no controllable Cv’s once you have dual aligned, so if you want a controllable Cv you must use a deg.5 2 span curve)Try always to have CV’s opposite each of their counterparts on the opposite crvMake sure you have clean crvs. with no spurious edit pointsOnce you have your immaculately tangent aligned balanced 4 curve set build a quick simple Square and look at the internal structure of that Sq. any non-sym. isoparms/ diagonal spans that have appeared are telling you that you’ve —- Up! So go back to your curves and correct any dissimilarities between North and south or E&W.The flow of the Curv. comb should show progressive curvature acceleration towards both adjoining boundaries. The thin red line should be smooth with no breaks or HORRIBLE angles.
To Learn Alias Automotive to Industry entry level has been made easier. Why not visit my website and take a look for your self?
Info. on Courses:
“Course #1”.
6 Months website access to all website based video tutorials, 167 Euros (200 USD equivalent Nov.2011)
“Course #2”.
167 Euros (200 USD equivalent Nov.2011) per month. You get your .wire reviewed by me every 15 days and you will receive : feedback, instruction, tips and advice from me personally. Access to all videos including my ” Private Student Training Videos”. You will build at least 3 complete automotive exteriors. The course also includes an intensive Reverse Engineering section, which required by most employers.
“Course #3”.
Fast Track Full Pro. “One to One” Course with weekly reviews and coaching 250 Euros (USD. 300 approx. Nov. 2011) per month. One to One Private tuition. You will receive specific geometry and meshes and modeling from me personally where required, to help you to complete your exteriors quickly to an Industry entry level standard. This means a bigger investment, but once in an Alias modeling job you will get back what you invested many times over and be able to work anywhere in the world
If you are in the USA, just register and login, then go to Profile and you can pay your subscription with your US credit card. Absolutely no extra charges for currency conversion.
Please donate just 1 Eur/1.3 USD. Why not take 2 min to do it now? Learning Alias sponsors the Education of children in Nepal. This is Deepana and we need to raise money to put her through Nursing College in Kathmandu. Learning Alias Blog is a free service, but if you would like to show your appreciation, please make a small donation. 100% of your money will go directly to pay Deepana’s and other children’s college fees. Without the help of sponsors in the developed world, Deepana would receive no education whatsoever, as she comes from a remote Himalayan village. Thank You for your kindness. 1 Eur/ 1.3 USD will keep a child for an entire day. Thank you. graham bullock. PayPal or Credit Card. NB: US Credit Card accepted. Charity credentials: BUDDHA MEMORIAL CHILDREN’S HOME TRUST. Registered Charity No: 1115373 .
Hi to everybody out there on the tough road to LearningAlias
I want to show you how to model an A5 front fender (radial wheel arch) and I was going to build my fender onto Andrea’s hood top and fender top, but as I always do, I downloaded a lot of great fotos of A5’s and REALLY studied them and soon realized that just like any big Audi, the A5 surfaces are very subtle and even tough her model is pretty sound, I needed the basic curves to be absolutely sound, in order to buld a sucessful model, so I would have to build my own model from scratch.
Audi Produce a Lot of 1:1 Clay Models
From the clay the Alias modeler can see where all these subtle surface changes are and then go on to incorporate them into the virtual model.
However even with nice well lit fotos I couldn’t be sure exactly what the A5 surfaces were doing,
so I did what I tell all my students to do, I went into a BIG supermarket car park and studied an A5 coupe. I shot a load of black and white pics. and all this will give me a better chance of making a model which is loyal to the Audi Styling.
Private Students
I’ll show you how to start-out and then if you a really serious about learning Automotive Alias you may want to subscribe to my website and follow the 200+ videos on building the A5 Sportback + other projects.
Just like anybody else, I don’t earn anything from tutorials. I love creating them and helping Alias fans who can’t progress because they are lacking help and support, but my income comes from my private projects and a few students on line, whom I supervise . They are all very serious about LeraningAlias and are all working hard to become good enough to become Product Designers/ Automotive Des. Modelers or Auto-Conceptual modelers and Class A Surfacers. One of my students recently landed a job designing fashion shoes and although she is finding it hard, she tells me that she works with really great people who are helping her a lot to improve further. The same goes for students who start at Entry level in Automotive Studios.
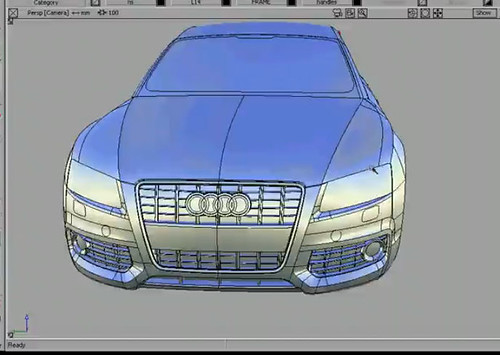
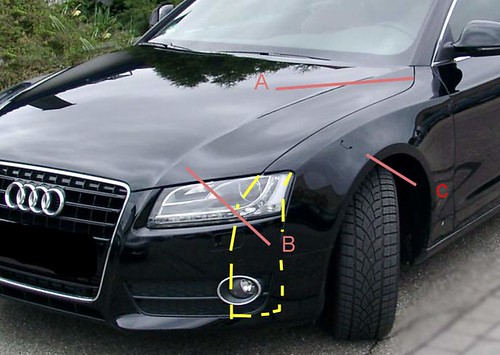
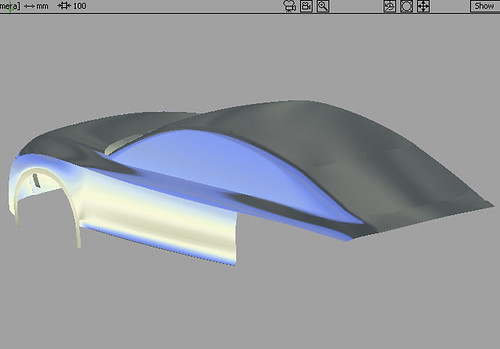
Look closely at the Hood Top
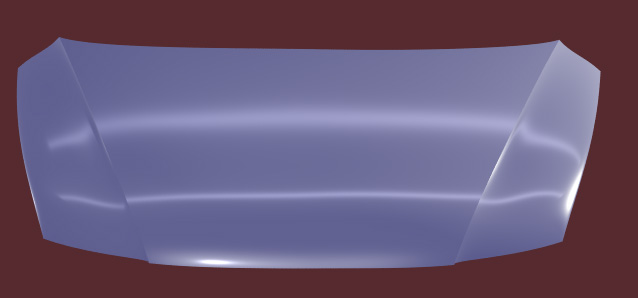
I want you to look very closely at how hood top curvature accelerates just a very small amount towards the edge. This is a design change and on the new model the feature has moved from being part of the hood top to being translated into a fillet at the edge of the fender. This acceleration is critical, as it runs down the side of the grille. On this model the grille is abhout 25 mm prominent. Audi nicked the idea from Bentley.You can see what I’m describing clearly in the ref: Foto. Please don’t take on a complex design like an aAudi, without preparing LOADS of reference pics and dimensions first:I’ve included a model I made of Audi’s older design hood top, so you can see the difference.Always start by setting your Construction Options. Mine will be Catia V5 (G0 “Position” = 0.001 mm etc.) Next set your reference planes VERY, VERY precisely. In the Left view, I have set the ceter of the front wheel at the origin (0,0,0). This is industrial std. practise.Next create your 0Y curves. Use small degree curves as they are easy to control. I have used some deg. 1 crvs. but mainly 2_3_4 and occasionally a deg. 5 where necessaryYou’ll notice that where the Hood Top and Radiator Grille curves join I have establised G3 continuity. This is evident for 2 reasons:
The outer RED line on the Curve Combs meet exactly
The 2 Combs flow smoothly with no sharp points indicating that continuity goes beyond the intersection, into the curves interior
You need both these criteria for G3 to be achieved
[sorry this picture is not available]
I’ll be showing you how to build parts of this model. This pic. I downloaded from You Tube.
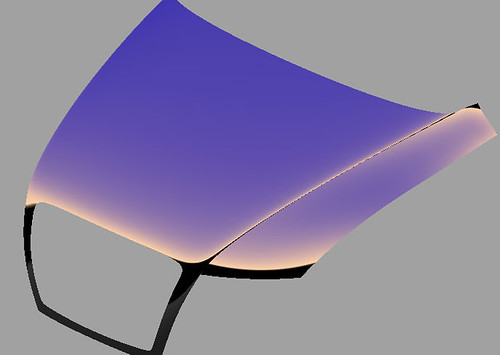
If you don’t have scan data or a Stylist to define the exact shape of the model you MUST look at a real car and work out how you are goin to layout your patches. You can see here I was planning to break the surf. to the left of the grille, but eventually I made it as one larger surf. Have a look at the markers, which point out the concentric ellipses indicating that your surfs. have good highlights. I actually scrapped this surf. and made one single surf. for the Fender top. Notice how you must use curve combs to show exactly what your surfaces are doing. This is the new sharper styled Audi hood top I have too much acceleration where the main hood top meets the fenders, so I need to sort that out and I also need to put some negative curvature where the fender meets the hood top. It’s not possible to get all this detailed info from pics. you need to go an find an Audi A5 and really look at it. A template former is a good tool to take out with you. Just put a strip of masking tape on the car and then push in your template taker, then draw the shape quickly before you loose it.It’s VITAL to start your first curves and your center surfs. very precisely. I am happy with the Hood Top, Radiator Grille surround and the Fender Top. Now the rest of my model will start to flow from these accurate foudation curves and surfaces.
This is pretty much the standard Patch Layout for modelling the main front end slab of an A5
It’s nice to see a car being born. but I do like to stick a bit of detail in early on, so I cut out the grille hole and offset the surface 40 mm back. It’s just how I like to model. It breaks up the intensitity of having to really concentrate on the extremely precise work of building the curves and surfaces.Getting started with a model is always very demanding, but it gets easier the more complete your model becomes.
The tutorial on this model will start real soon.
Cheers,
graham
Pictured below is an Audi A5 Sportback built by one of my students who is now a Digital Sculptor for GM.
Full HD video, just click the picture below
I am now putting some of my tutorials on YouTube, so whilst you’re there you may wish to check them out. There’s a full tutorial on how to create a Ball Corner to Class A Surfacing, Catia V5 spec.
For student’s who have the objective of finding a CAD job in the near future, I still teach One to One students and all of these students get Automotive Modeling or Design/Modeling jobs, so it’s a great investment to make.
Many of my students make it to the top and succeed in becoming pro. Alias Digital Modelers. The hourly rate is very high and there are vacancies in UK. France, Germany, USA, Brazil etc.
My New Website is now live!
I am a top flight Alias Trainer/Modeler, specializing in taking students who are either currently studying or who have left college/university and want to learn the skills they need to reach Alias Automotive Entry Level. I offer the best value Alias training deal out there!
To Learn Alias Automotive to Industry Entry level has been made easier.
For student’s who have the objective of finding a CAD job in the near future, I still teach One to One students and all of these students get Automotive Modeling or Design/Modeling jobs, so it’s a great investment to make. The hourly rate is very high and there are vacancies in UK. France, Germany, Sweden, Spain, USA, Brazil etc. I can only take a maximum of 5-7 students at any one time. I teach all levels right up to Post Graduates. I have never had a Private student fail to get an Alias Automotive job (Companies include Ferrari, GM, Lotus, Opel, Audi Seat etc. ). If you wish to apply for a place, please email me with all your details. Why not visit my website and take a look for your self?
Over 100 videos on many, many aspects of Learning Pro. Alias
I show you how to build a Complete Audi A5 Sportback (ext.) . Over 50 Videos on that alone !
Info. on Courses:
“Course #1”.
6 Months website access to all website based video tutorials, 167 Euros (215 USD equivalent Sept. 2012)
“Course #2”.
167 Euros (215 USD equivalent Sept. 2012) per month. You get your .wire reviewed by me every 15 days and you will receive : feedback, instruction, tips and advice from me personally. Access to all videos including my ” Private Student Training Videos”. You will build at least 3 complete automotive exteriors. The course also includes an intensive Reverse Engineering section, which required by most employers.
“#3 Full Pro. “Elite” Course”.
Fast Track Full Pro. “One to One” Course with weekly reviews and coaching 200-250 Euros (USD. 260-320 approx. Sept. 2012) per month. One to One Private tuition. You will receive specific geometry and meshes and modeling from me personally where required, to help you to complete your exteriors quickly to an Industry entry level standard. This means a bigger investment, but once in an Alias modeling job you will get back what you invested many times over and be able to work anywhere in the world
NB: Typically students pay 50% of the cost of the “Elite” course by monthly installments settling the balance over time, once they have an Alias Automotive contract.
*** Special 25% Discounts for US students (Message me on my website for details)
USA:
If you are in the USA, just register and login, then go to Profile and you can pay your subscription with your US credit card. Absolutely no extra charges for currency conversion.
If you are in the USA, just register and login, then go to Profile and you can pay your subscription with your US credit card. Absolutely no extra charges for currency conversion.
Fees include regular feedback on your work with comments, tips and advice from me www.learningalias.co.uk
At LearningAlias you learn how to make Top-Flight
Professional standard models
Nothing is swept under the carpet. You learn how to model evry single detail
of prestigious exteriors like the wonderful A5 Sportback, dsigned by my personal friend Satoshi Wada of SWdesignTokyo.
With Alias Automotive models of this pro. standard
to show at interview, 95% percent of my students walk into jobs
as the Automotive Industry is crying out for guys who have these
advanced modeling skills
Alias Tutorial CROWNING SURFACES Preview
Alias Tutorial C Pillar Blend -PREVIEW
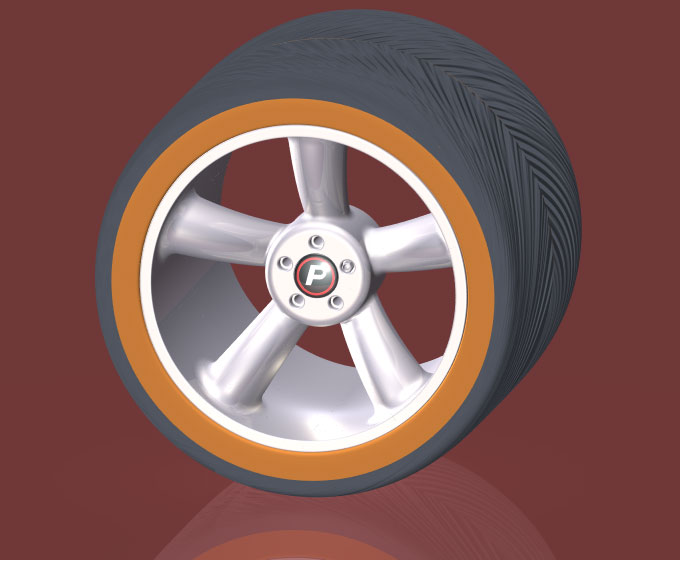
I have had some good feed back on my Alias Wheel Tutorial
In the Automotive Industry the wheel is not part of the main Alias Exterior work flow. Alias Modellers use light weight file size “Styling” Wheels on their models.They can import a heavy wheel when the Designer wants to see a high quality rendering.When I worked at Audi Design, they had a very talented female Alias modeller, who’s current project was designing and Alias modelling, just wheels. They are a specialist item.I’ve had a question about how to achieve Catia V5 tolerances on this model, which I’ll answer on this site soon. I have several students to look after and of course their problems have to come first.
Hi to All My Fiends Trying to Learn Alias
Understanding Audi Surfaces
The Audi Design budget is one of the biggest in the industry and they are consequently able achieve very high quality surfaces. Audi surfaces are more accurate and more complex than many other manufacturers.If You Can Build an Audi Model Well, You Can Build Any Vehicle, but you wont be able to build an A5 coupe correctly on your own, just from tiny canvas imgs. To build even a reasonable model which includes the subtle styling lines of an A5, you’ll have to find one in the street/car park and study it and photograph it from every angle and then when you’ve done that zoom in a capture all the intricate surfaces. Just one example is how the hood top flows down the side of the protruding “Bentley style grille”. All this detail was worked out on a 1:1 scale model with the Stylist. Then it was scanned into Alias Surface and modelled, so You can’t build the real thing from canvases.
This is how my students work:
They model the exterior to the best of their abilities from the canvases and photographs that they have taken from a real car (Often the local Audi dealership will let you shoot your pics. as long as you explain why you need them). Students get started and then send me a copy of their .wire I then study it and using my experience from working at Audi Design, I mark up screenshots pointing out where they have misread the surfaces and suggesting work flows for difficult areas etc. Working with my support students don’t get really stuck and stressed out. They complete the model with me coaching them and then go on to make a second model with far less help from me. They may not realise it but they are well on the way to becoming competent CAD modellers.I’ve been helping Andrea in Rome with the most difficult surfaces on her A5 Coupe; the front fender and the rear “C” pillar.I will be writing a post on these problems very soon.
To Learn Alias Automotive to Industry Entry level has been made easier.
For student’s who have the objective of finding a CAD job in the near future, I still teach One to One students and all of these students get Automotive Modeling or Design/Modeling jobs, so it’s a great investment to make. The hourly rate is very high and there are vacancies in UK. France, Germany, Sweden, Spain, USA, Brazil etc. I can only take a maximum of 5-7 students at any one time. I teach all levels right up to Post Graduates. I have never had a Private student fail to get an Alias Automotive job (Companies include Ferrari, GM, Lotus, Opel, Audi Seat etc. ). If you wish to apply for a place, please email me with all your details. Why not visit my website and take a look for your self?
Over 100 videos on many, many aspects of Learning Pro. Alias
I show you how to build a Complete Audi A5 Sportback (ext.) . Over 50 Videos on that alone !
Info. on Courses:
“Course #1”.
6 Months website access to all website based video tutorials, 167 Euros (215 USD equivalent Sept. 2012)
“Course #2”.
167 Euros (215 USD equivalent Sept. 2012) per month. You get your .wire reviewed by me every 15 days and you will receive : feedback, instruction, tips and advice from me personally. Access to all videos including my ” Private Student Training Videos”. You will build at least 3 complete automotive exteriors. The course also includes an intensive Reverse Engineering section, which required by most employers.
“#3 Full Pro. “Elite” Course”.
Fast Track Full Pro. “One to One” Course with weekly reviews and coaching 200-250 Euros (USD. 260-320 approx. Sept. 2012) per month. One to One Private tuition. You will receive specific geometry and meshes and modeling from me personally where required, to help you to complete your exteriors quickly to an Industry entry level standard. This means a bigger investment, but once in an Alias modeling job you will get back what you invested many times over and be able to work anywhere in the world
NB: Typically students pay 50% of the cost of the “Elite” course by monthly installments settling the balance over time, once they have an Alias Automotive contract.
If you are in the USA, just register and login, then go to Profile and you can pay your subscription with your US credit card. Absolutely no extra charges for currency conversion.
I am a top flight Alias Trainer/Modeler, specializing in taking students who are either currently studying or who have left college/university and want to learn the skills they need to reach Alias Automotive Entry Level. I offer the best value Alias training deal out there!
Special Winter Discount Package
Courses in order of cost:
“Course #1”.6 months Website Access
6 Months website access to all video tutorials, 167 Euros one-off payment (228 USD equivalent Nov.2011)
Courses, including reviews and coaching:
“Course #2A” Private Tuition Package
167 Euros per month (228 USD equivalent Nov.2011)
(Your work will be reviewed every 15 days and you will receive : feedback, instruction, tips and advice from me personally, modeling demonstrations from me on your .wire and I will supply Meshes to help you with difficult areas of your model).
“Course #2E” Economy Private Tuition Package
100 Euros (135 USD equivalent Nov.2011) per month. You get your .wire reviewed by me every 15 days and you will receive : feedback, instruction, tips and advice from me personally. Access to all website videos
“Course #3”. Fast Track Full Pro. “One to One” Course
250 Euros (USD. 339 approx. Nov. 2011) per month. One to One Private tuition with weekly reviews of your .wire. You will receive specific geometry and meshes and modeling from me personally where required, to help you to complete your exteriors quickly to an Industry entry level standard. This means a bigger investment, but once in an Alias modeling job you will get back what you invested many times over and be able to work anywhere in the world
If you are in the USA, just register and login, then go to Profile and you can pay your subscription with your US credit card. Absolutely no extra charges for currency conversion.
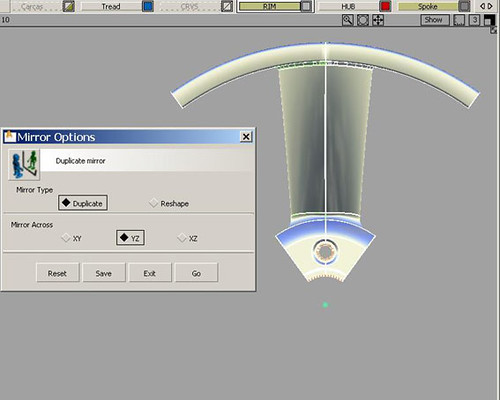
Mirroring the 36 deg half segment accross the YZ plane to form the first segment of the 5 segment wheel
Create an eliptical, conical, curved spoke
Learn how to allow space for the creation of fillet surfaces later on in your work flow
Create curves on surface using the Tubular Offset Control tool
Repair c-os that are short of the relevant surface edge
Cretate freeform fillet surfaces
Here goes:
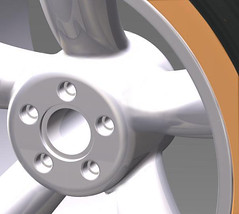
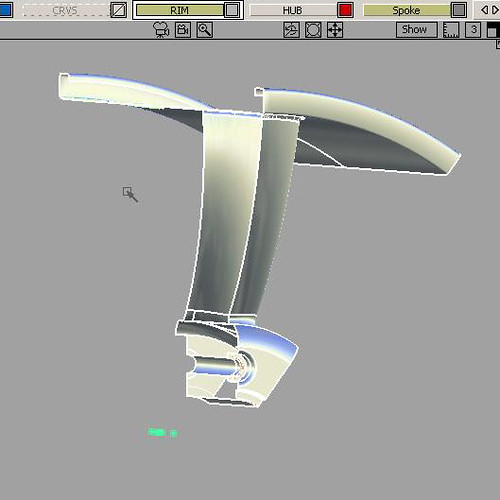
Here’s our half segment comprising the Rim, Hub and Spoke geometry
Check that in creating the curve in the spoke you haven’t moved it in the X axis
Zoom in very close and check that the vertical surf. edges of the spoke are still absolutely placed on the YZ pane where you created themIf anything is wrong you must reposition the half spoke so that it is sitting in the right place (if you have moved it or rotated it by mistake and can’t recover position, then delete it and build a new half-spoke surface)
If all is well >edit >duplicate>mirror and mirror the half spoke accoss the YZ plane
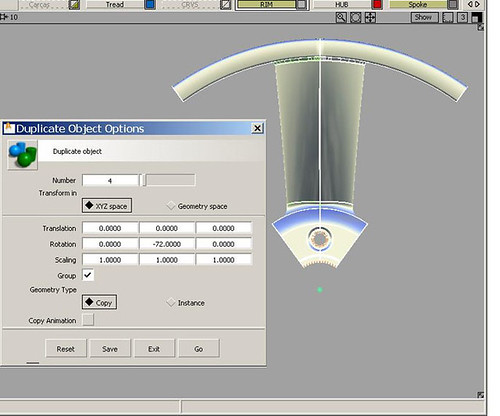
Now you have created one segment of the 5 seg. wheelAll you have to do now is >edit>duplicate>object
>edit >duplicate>object.
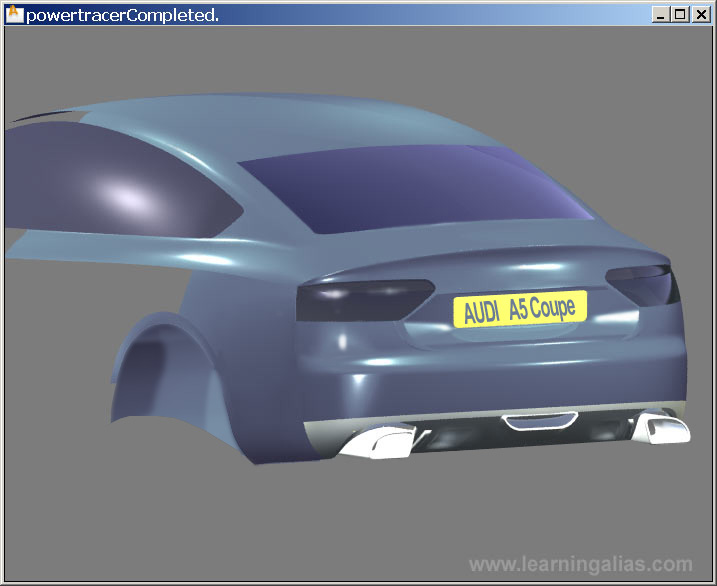
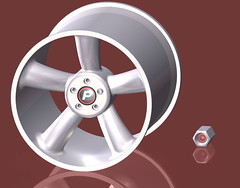
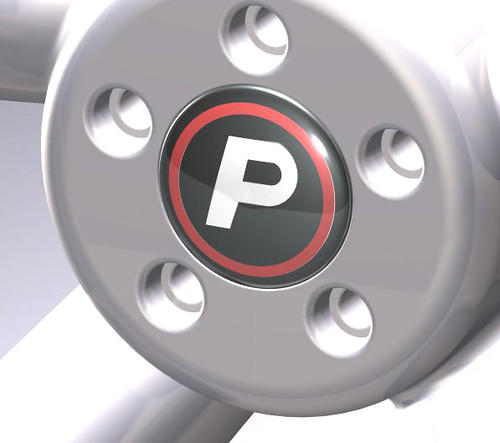
Set up the options box to create 4 copies and rotate 72 deg. each copy. This will produce your complete wheel geometryHere is the rim rendered in “Powertracer”
Enjoy!!!!!!!!
Kind Regards
graham bullock B.Ed. Des & Tech.Pro. Modeler & Alias Trainer