Autodesk Alias Studio Tutorial -Wheel – 4

Alias Wheel Tutorial – part – 4

Finished-1a

Alias Studio Wheel Tutorial – part – 4Author: graham

Objectives:

  • Projecting and trimming bolt hole

  • Building internal surfaces for bolt Hole

  • Filleting surface edges

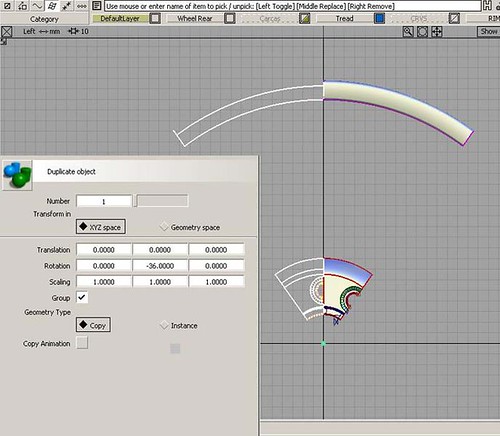
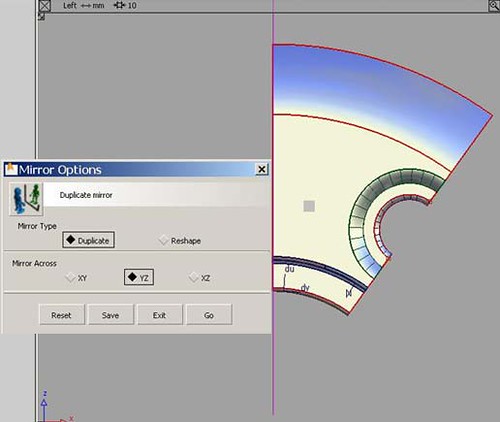
  • Mirroring the 36 deg half segment accross the YZ plane to form the first segment of the 5 segment wheel

  • Create an eliptical, conical, curved spoke

  • Learn how to allow space for the creation of fillet surfaces later on in your work flow

  • Create curves on surface using the Tubular Offset Control tool

  • Repair c-os that are short of the relevant surface edge

  • Cretate freeform fillet surfaces

Here goes:

1r3
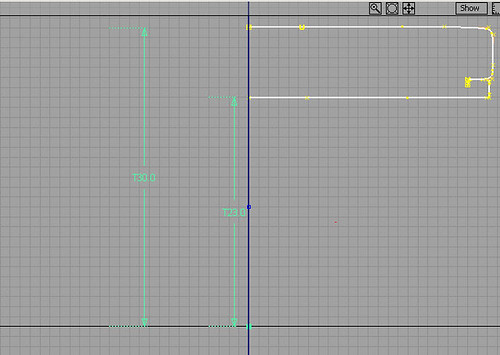
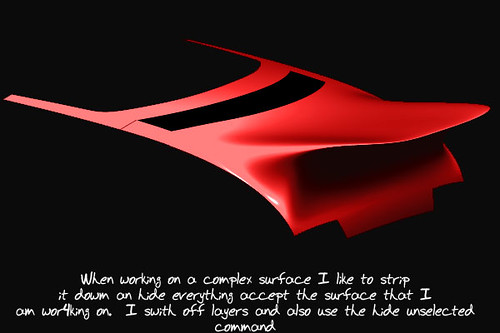
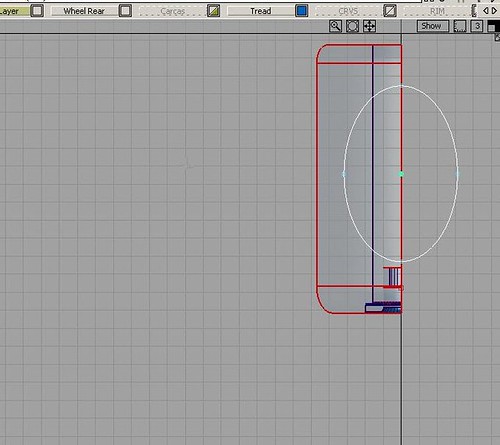
Top view, select only the left half of the Hub segment and hide the rest of your model >Object Display>hide unselected>Create an ellipse on the Y axis which represents the cross section of your 1st Spoke >keypoint curves>ellipse>>and set the attributesMake sure that you leave 13mm clearance around it on the center surf. of your hub (This space will be needed to create the fillet between the Spoke and the Hub)Detached the ellipse on its major axis and delete the part shown as highlighted.>object edit>detach tool.
1s
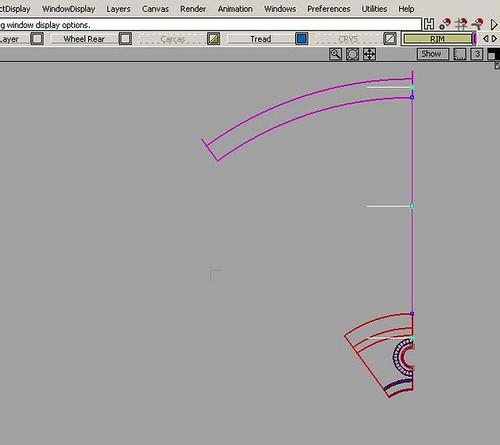
Left view copy and paste the half ellipse twice and move 2 of them upwards. Place copy N0.1  in the vertical center of the spoke and then copy N0.2  just above the Rim levelMove the 1st one down inside the Hub
1s1Scale the 2nd and 3rd half ellipses up in size, so that your spoke will get thicker towards the topAs an aid for scaling the ellipses in the Left view I placed a keypoint curve at an angle representing the outside edge of the spoke. You can see this as a short line on the minor axis of the ellipses in my pic.
1s2
1s3
1s4
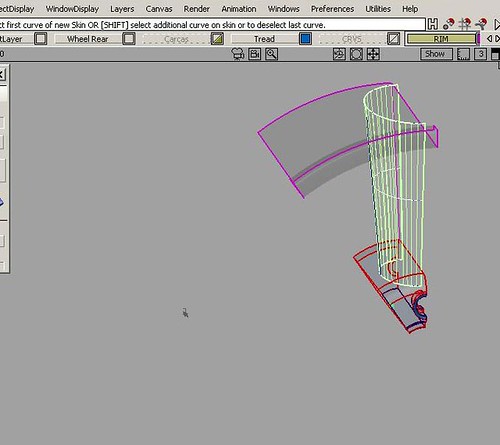
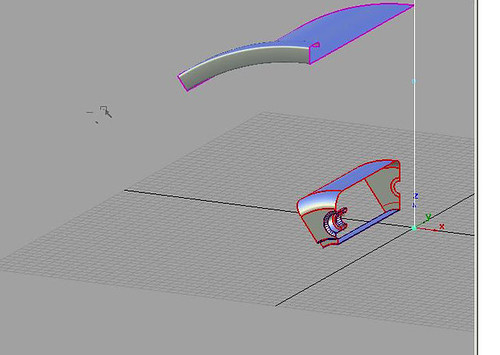
Perspective view: with the skin tool selected click on the bottom ellipse, then the middle one NOW hold the shift key as you click on the top ellipseAs you can see your new spoke’s skin surface has loads of spans. Go to the control panel and reduce them to say 8Perspective view: Move the middle elipse out along the Y axis, this will create an attractive curve in the spoke’s surface, as the surface updates to the curves movement. This is the magic of Alias at work!You’ll also need to move the top ellipse in, so that you have space on the Rim’s surf. to create a really attractive 25mm fillet
1t
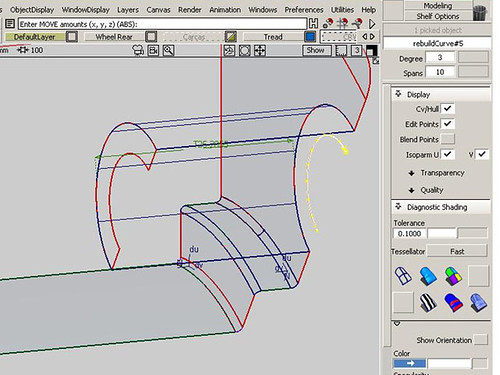
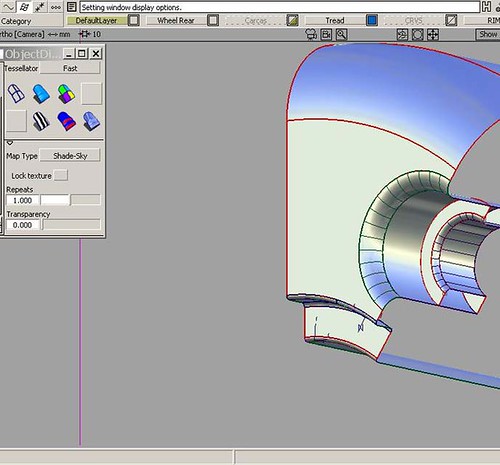
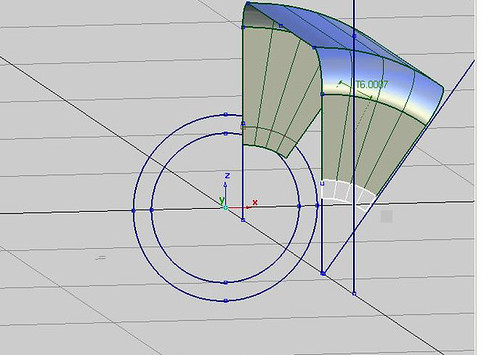
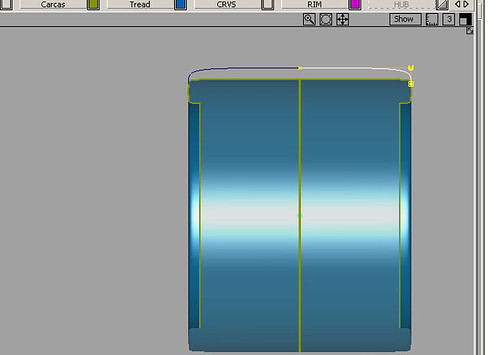
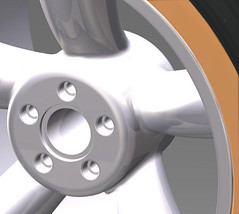
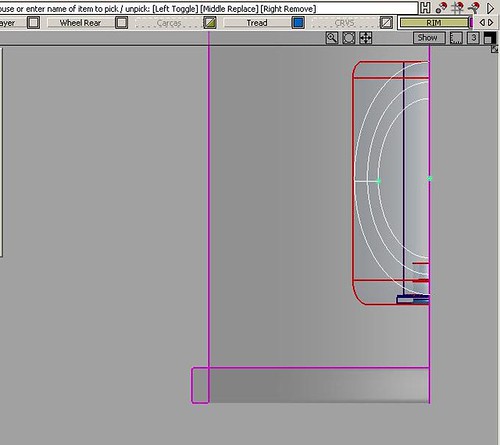
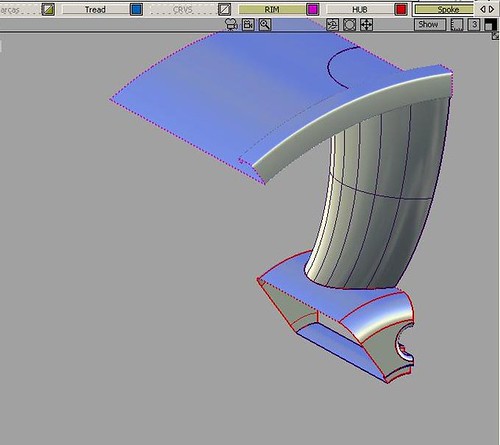
Front view: We can see that we have created a really beautiful shaped spoke just by one, scaling the ellipses and two, moving the center ellipse.Now we are going to create the milled rebate surface where the wheels center (hub) locates onto the wheel bearing/disc brake hubSkin a surf. to form the bolt hole milled through the hub, as shown
1t2
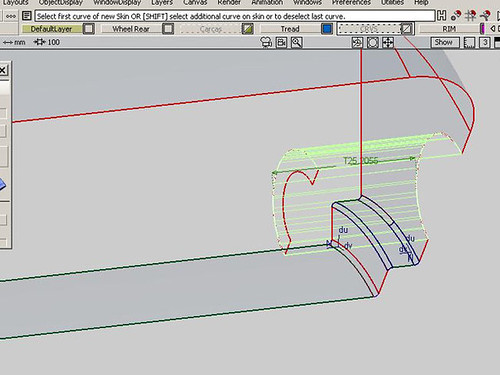
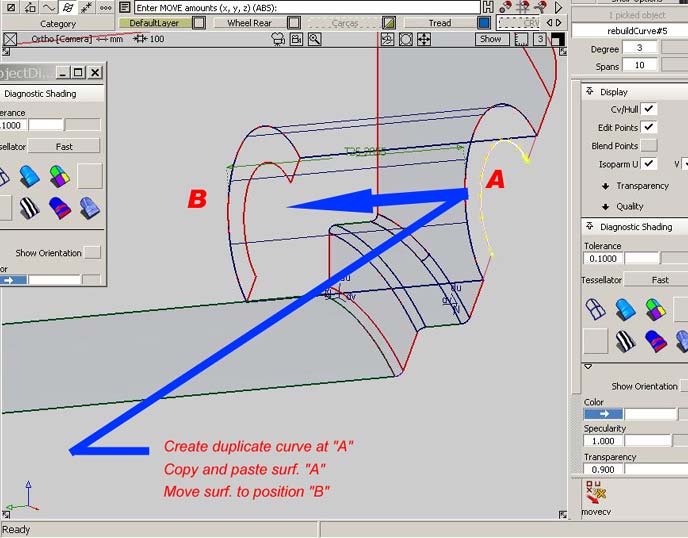
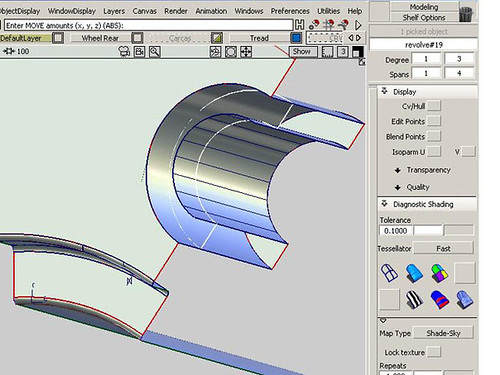
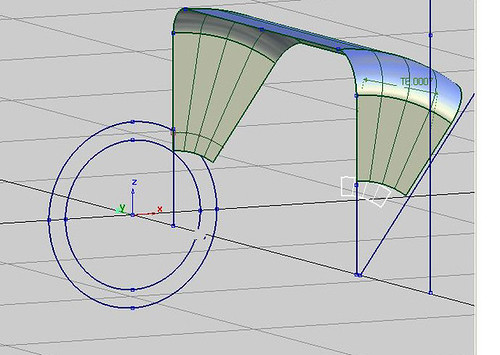
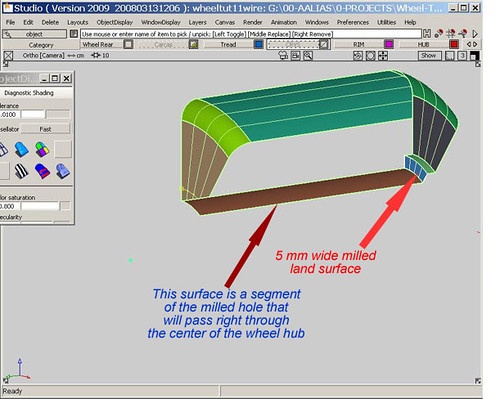
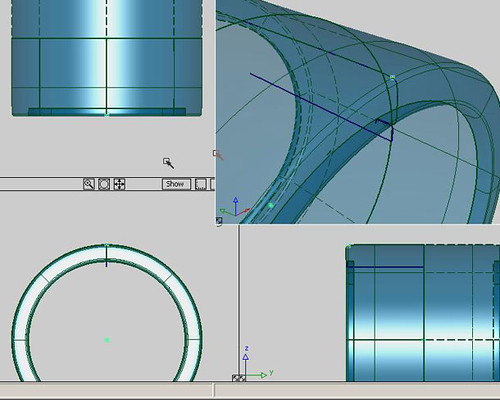
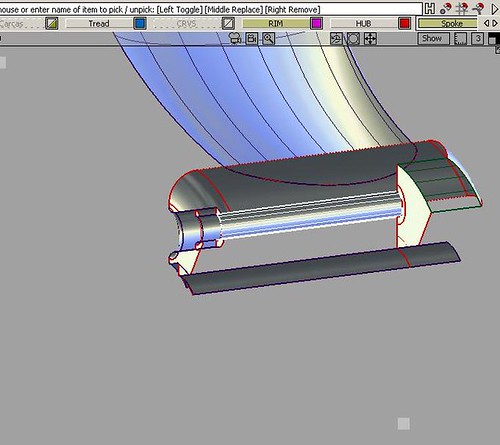
Select the verticle surface at the rear of the wheel hub and move it about 15mm forwards along the Y axisPerspective view: Create a skin surf. to complete the milled rebate and trim off the redundant part of the wheel’s center hole surf.Now intersect the spoke surf. with both the Hub and Rim surf. and trim off the excess
1t3>
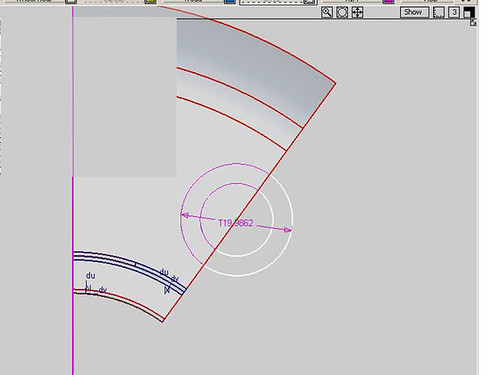
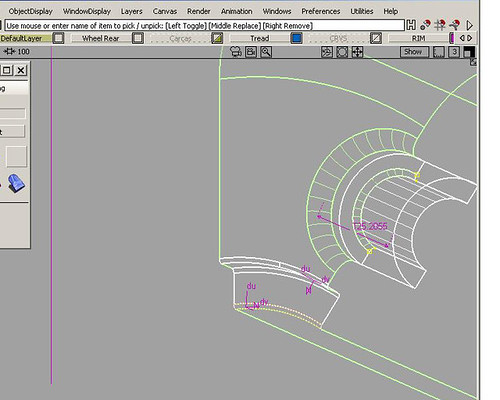
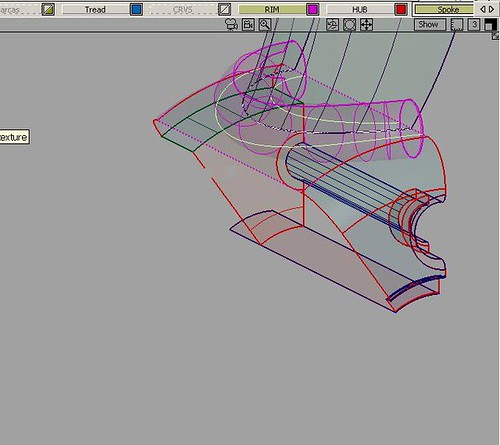
surface> fillet flange tool>Tubular Offset tool. Set the tool up as shown.Where the spoke and hub intersect, select both C-O-S (curves on surface) this will produce a tubular surface which intersects both your surfaces with an offset distance = to the radius you have set. whilst creating c-o-s on the relevant surfs.If you don’t get c-o-s on both the spoke and the hub, just intersect the tubular surf. with the surf. that is missing a c-o-s.i.e. with the intersect tool >the spoke > go > the hub > go.Now delete the tubular surf. as it has done its job

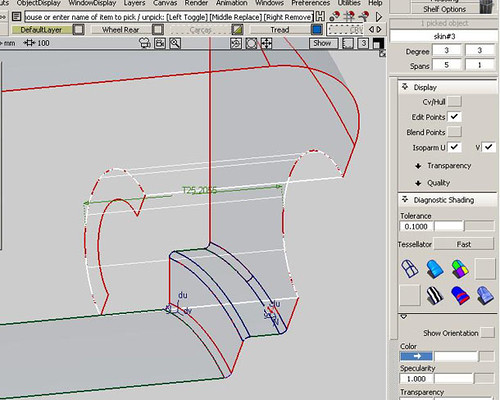
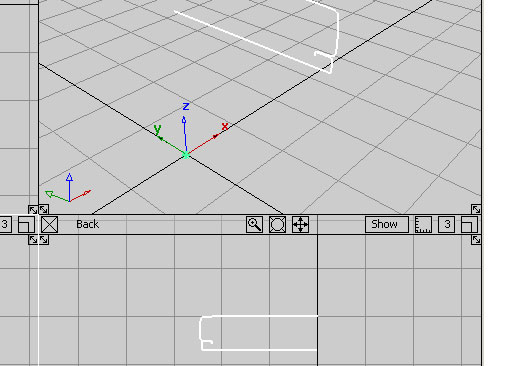
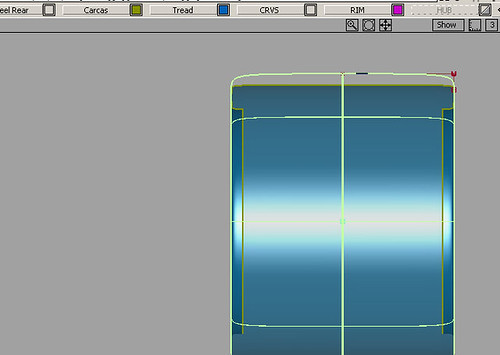
IMPORTANT: make sure that your c-o-s reach the edges of the relevant surfaces. If they don’t, extend them with >object edit>extend tool (with merge and extrapolate switched on). If this doesn’t work create small curves and project them, Top view for the Hub and Front or Back view for the spoke to continue the c-o-s to meet the edges of your surfs.

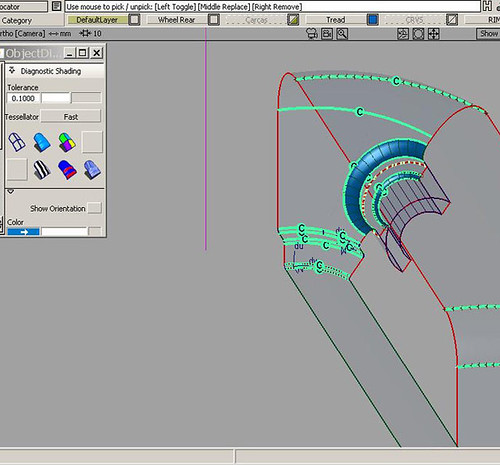
Here are the C-O-S selected and ready to create the fillet surf.
1t4
1t5b
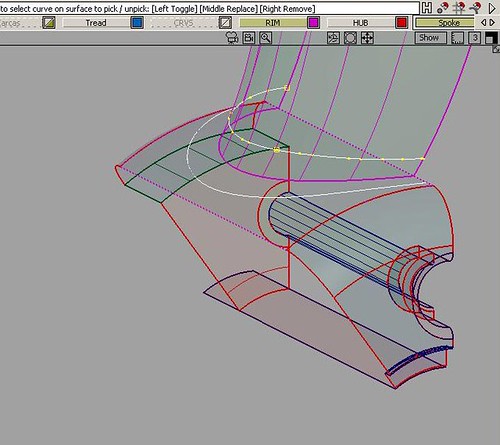
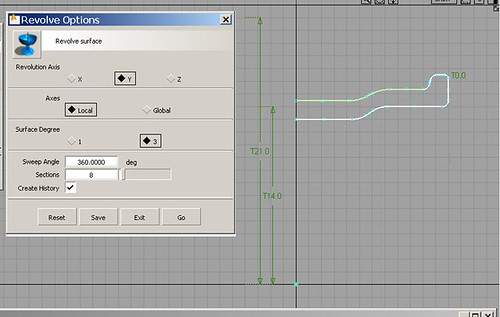
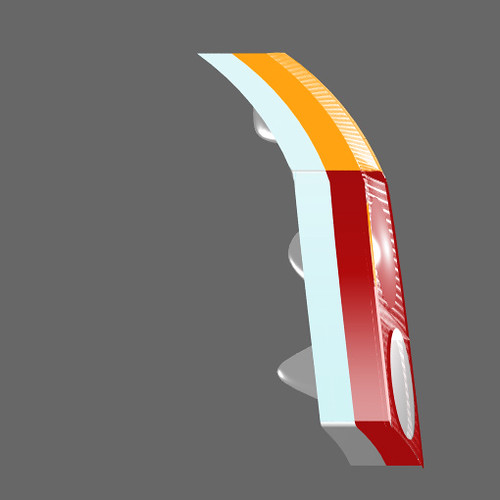
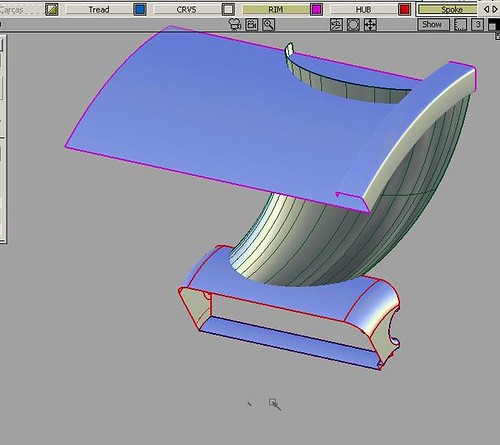
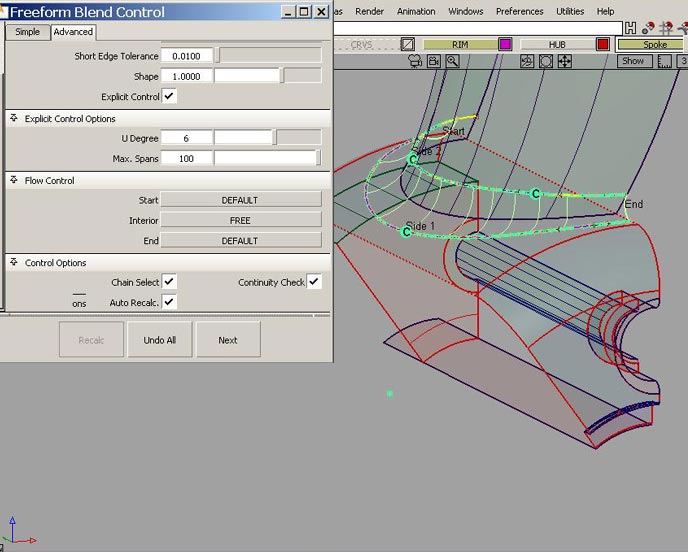
Perspective view: >surface>freeform blend control. Set as shown
1t6
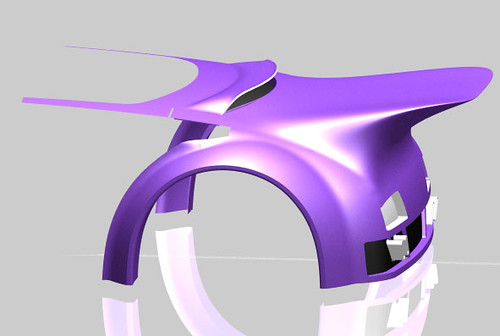
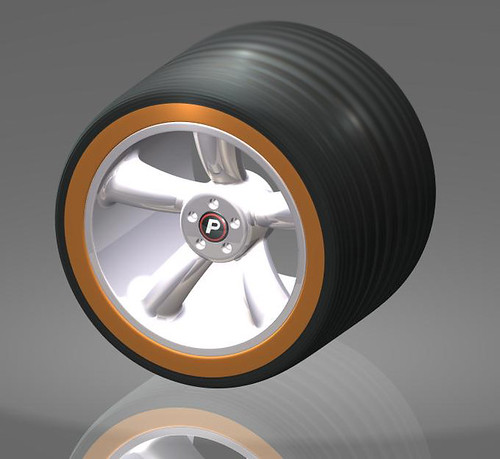
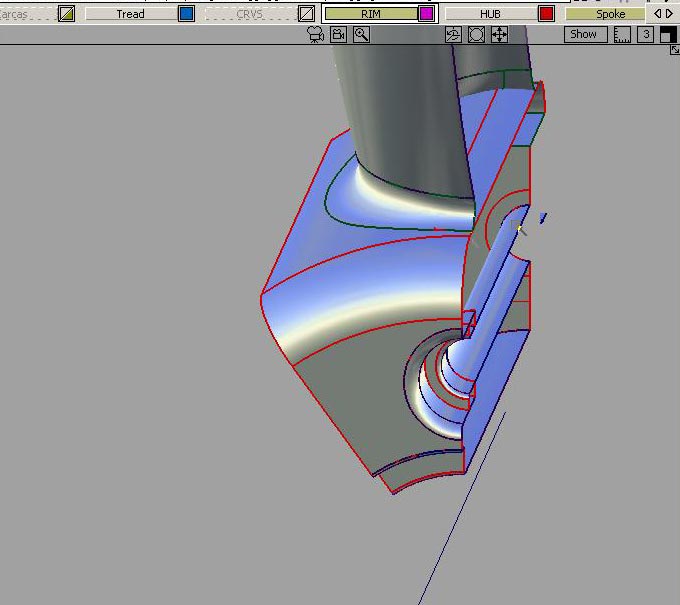
Congratulations you have created a really tricky surface set, that looks beautiful !!!________________________________________________________________

Autodesk Alias Studio Tutorial -Wheel – 3

Alias Wheel Tutorial – part – 3

www.learningalias.co.uk

Finished-1a

Alias Studio Wheel Tutorial – part – 3,Author: graham bullock B.Ed. Design and Tech

Objectives:

  • Projecting and trimming bolt hole

  • Building internal surfaces for bolt Hole

  • Filleting surface edges

  • Mirroring the 36 deg half segment accross the YZ plane to form 1 segment of the 5 segment wheel

Here goes:

1m2In the Left view create a circle. Snap it to the edge of the segmentScale it to  r=10mm. Use the information window and type in the Z and X dimensions (>windows>info.window. I have mine on my mouse menu)Copy and paste the circle and scale the new one to your bolt dia. say r =5mm.Project and trim divide to get your “C” shaped milled surf. as we did earlier. Delete the 1omm dia inner bolt hole circular trim surf.
1oNB: The skin surface has a lot of spans, which makes for a heavy surface, so for this model we are going to reduce its spans:Go into the control panel and with the surface selected change the number of spans down to say 4. You will be warned that you will delete the memory >OK and then at the bottom of your monitor >accept (if you forget to click accept, your changes will be undone.)
1ozz
1o1
1o2In the perspective view create a duplicate curve on the inner edge of the “C” surf.Move the trim divided “C” surface inwards along the Y axis, the depth of your wheel nut or bolt head, say 25mmCreate the skin surf shown from the original hole to the outer edge of the “C” surf..Copy and paste the “C” surf. and slide your new surf. back along the Y axisNow skin the inner surf. of the bolt hole. If this is difficult to follow, don’t worry  everything you need to do is shown very clearly in the pics.
1o3Using the >surface>round tool. Create your fillets as shown
1p
1p2
1p3
1p4

1qc

NB: For Beginners. The Round Fillet Surfacing tool won’t give you accurate surface joints for much of the time,

but the quality it produces is fine for the purposes of this aesthetic model. There are work flows that experienced Alias folk apply after forming a fillet with the Round tool, that will tighten up the fit and curvature to meet high tolerance specs. These work flows involving the: untrim, project normal and align tool can be learnt further down the line.

I am working to tight tolerances

and maintaining G2 (curvature continuity) wherever I can and settling for G1 (tangency) when I have toOn a Styling model like this you don’t need to work to these tight tolerancesIf you want to work to Catia V5 you can, but if you haven’t been doing Alias long then there’s no need to beat yourself up on this particular Styling model, trying to get G2 which is 0.001mm. Work in a lower Construction Option. >preferences>const. options.e.g: >preferences>const. options>general constr. settings

We have built our 36deg. half seg. of our wheel to the right of the Z axis in the Left view.

Turn on the rim layer>edit>duplicate>duplicate object. and rotate 1 copy -36 deg. and delete the original.
1qb
1p5>edit>duplicate>mirror>duplicate mirror tool and mirror back across the Z axis
congratulations

Congratulations! You have made the first 72 deg. segment of the wheel rim and hub

________________________________________________________________

Autodesk Alias Studio Tutorial -Wheel – 2

Learning Alias sponsors the Education of children in Nepal. This is Deepana and we need to raise money to put her through Nursing College in Kathmandu. Learning Alias Blog is a free service, but if you would like to show your appreciation, please make a small donation. 100% of your money will go directly to pay her college fees. Thank You, graham bullock.

Alias Wheel Tutorial – Part – 2

Finished-1a

Alias Wheel Tutorial – part – 2Author: graham

Objectives of part – 2

  • Create revolve surf. 36 deg segment for rim

  • Create Hub Curves

  • Build center milled rebate for wheel center Cap

1dIn the Perspective view go to >palette>surface>revolve tool and and set it up as shown.Select the rim crv. and make a 36 deg. revolved surf. from the Z axis (Important set the tool to revolve on the “Y” axis)Make a new layer, call it Rim and assign your surface.

Hub Curves

1eIn the front view lay down 3 key lines Palette>curves>keypoint curve toolbox
1gTypically the hub would be either flush with the rim in the plan view or slightly inboard of the outer rim flangeBuild your curves up from the Y axis.>palette>curve edit> curve fillet tool and create fillets on the top outer and top inner corner of the hub crvs. (If you create history whilst you are using this tool, it wont work, so just select the offending crv. and delete its history >delete>delete construction hist.)Revolve your hub crvs. 36 deg, exactly as you did your rim.
1hCreate a new layer and name it Hub. Assign your surf.In the Left view snap a circle to the origin LHM+Alt.Scale circle to the size that you want your center cap to be, then copy and paste the circle (In this tutorial copy and paste is always Ctrl+C, Ctrl+V)The copied crv. is now active, so scale it down 5mm in its radius to represent the milled hole which will run through the center of the cast wheel.

Creating the Offset Milled Land For The Cap Aperture

1jIn the Left view project your 2 circles onto the hub’s front and back surfs.Trim divide to create a “C” shaped surf, which will be the milled land to allow the center cap to be driven home. Delete the 2 small triangular surfs.
1kIn the Perspective view, move the “C” shaped surf. inwards along the Y axis 5mm
1lUsing the Skin tool. create a surf. from the hole in the hub to the edge of the “C” surf. and another one to create the surf. of the hole which will be milled right through the casting.________________________________________________________________

Autodesk Alias Studio Tutorial -Wheel – 1

100% of donations go to provide food shelter and education for the abandoned Street Children of Nepal. Please give a few USD/Euro back. Why not do it right now by C.C. or Paypal? Charity credetials: BUDDHA MEMORIAL CHILDREN’S HOME TRUST. Registered Charity No: 1115373 . Thank you, graham bullock

USA:

If you are in the USA, just register and login, then go to Profile and you can pay your subscription with your US credit card. Absolutely no extra charges for currency conversion.

Hi,

I am busier than ever these days, now that I have launched my ALL VIDEO tutorial site

with contract modeling, teaching one to one students from all 5 continents and now of course my brand new website has gone live and it is possible to learn Alias Automotive to a professional level for the lowest rate on the planet.

Pictured below is an Audi A5 Sportback built by one of my students who is now a Digital Sculptor for GM.

Full HD video, just click the picture below

I am now putting some of my tutorials on YouTube, so whilst you’re there you may wish to check them out. There’s a full tutorial on how to create a Ball Corner to Class A Surfacing, Catia V5 spec.


how to build a car


Go to Learning Alias

Over 100 videos on many, many aspects of Learning Pro. Alias

I show you how to build a Complete Audi A5 Sportback (ext.) . Over 50 Videos on that alone !

www.learningalias.co.uk

Level: First Year University

Author: Graham Bullock B.Ed.

Before you start this tutorial I recommend that you complete all the standard Autodesk Alias Studio Tutorials. Starting with the “chair” right through to the “mouse” and that you register with AliasDesign:(Alias Design Community)

http://aliasdesign.autodesk.com/

And also you should complete several of the fantastic tutorials on the Alias Design website.

The whole point of this tutorial is to show you how to make a Simple wheel, which has VERY light geometry.

When I build a complete Alias automotive exterior I build the wheels in a separate stage, save it as a separate .wire and import it into the parent model ONLY when I need to either evaluate the vehivle aesthetically or render the complete vehicle.

Alias Wheel Tutorial – Part-1

1

Alias Wheel Tutorial – part – 1Author: graham bullock B.Ed. Design and Tech.

Objectives of part – 1

  • Create a New Project

  • Organise workflow assigning to layers

  • Build revolve curves for Rim, Tyre Carcass and Tread Surface

  • Revolve Tyre and Tread Surfs. 360 deg. in Left View

These simple curves are all I have used to create my wheels for my Porsche style car which I have developed with you on this website. All designers need to have very basic wheels right from the begining of the project (Just the rim and tyre size is important at the early stages of the exterior design process. Wheels are usually exaggerate being much wider and with tyres lower in profile than the road vehicle will have. This helps to win Design Shows and gain the budget necessary to further the progress of the design .)
1aA more realistic rim section would start to look like this, but it is not really needed for a simple styling wheel.
1a-2So here are my simple revolve curves.Open a new stage.Create the curves in the front view on the +Y side. Set them the distances above YO that I have shown in the pic. Make sure that you select Transform>pivot and move the pivot down to the orign. Really zoom in close and double check that the pivots for your revolve crvs. are absolutely at the origin of the world space.Click save and navigate to your Projects. >C:/>Alias>Projects. At the top right of the Save Wire windows select New Project from the drop down. Open the wire folder and save your new curves stage. Navigate up 1 level and rename your “New Project” as, “my-wheel-1″Revolve your tyre carcass curve. The tyre carcass  surf. has been create with >Surf>revolve tool (8 spans, 360 deg. global axis Y.)Assign the curves to a new layer and name it CurvesAssign your tyre revolve surf. to a new layer and name it Tyre CarcassTurn on the layer symetry to create the complete width of the tyre. (If the symetrical half does not appear where you want it, select the Tyre layer>layer>symetry>set plane and set the plane up correctly)
1cGo to the perspective view and place the 1st point of a new curve [ New Curve( CV’s)]on the outside, upper edge of the tyre carcass revolve curve.
1c1In the front view build the rest of the curve by adding 3 more cV’s. This curve will be the revolve curve for the tread surface. The 1st CV is the bottom edge of the tread, vertically above it (front view) are Cv’s 2 and 3 on top of each over and the 4th CV is horizontal to them on the Y0.(When you form your revolve surf. and turn on layer sym. you  will have tangency “G0” . NB: I mirrored my crv. accross and checked it with a curvature comb. I recommend that you use curvature combs at all times. Working without them always leads to disaster sooner or later.
1c2The Tyre Tread surf. has been create with >Surf>revolve tool (8 spans, 360 deg. global axis Y.)
tyre-finished-1


This is a very basic tire model. If you are interested in learning Top – Flight modeling workflows, as show below, you can study all of them on my website

This Pro. Tire Modeling tutorial is available along with many others on my subscriber website

I am a top flight Alias Trainer/Modeler, specializing in taking students who are either currently studying or who have left college/university and want to learn the skills they need to reach Alias Automotive Entry Level. I offer the best Alias training deal on the Planet!

Fees: Accsess to all my 200+ videos, including the complete Audi A5 Sportback, my Virrage concept car and many other projects

228$ /167 Euros per month (599$ /440 € 3 months/ 1899$ /1400 € anual)

Working on a small budget? No problem! Ask about the 137 USD./100 Euro per month economy package

Student Discounts up to 50%: Discounts are available for students enrolled in full-time education. Price on application.

www.learningalias.co.uk

For really serious Alias students,

who wish to learn pro. modeling skills in a condensed time frame, I also run “One to One” Internet Coaching at a cost of

250 Euros pcm.

I can only take a maximum of 5 students at any one time. I tech all levels right up to Post Graduates and Alias modelers in their first year in Industry. I have never had a private student fail to get an Alias Automotive job (Companies include GM, Lotus, Opel, Audi Seat etc. )

If you wish to apply for a place, please email me with all your details.

Kind Regards

graham bullock B.Ed. Des & Tech.Pro. Modeler & Alias Trainer


Posted in Uncategorized | 1 Reply

Autodesk Alias Studio Tutorial – Rear Lamp Assembly – 2

Alias Studio Rear Lamp Assy.

If anybody ever asks you to build a complete rear lamp assembly. Throw your appointment book out the window, because you have just been lumbered with a really difficult task.

How Do You Start?

Like most things in Automotive modelling, you don’t even have one datum surface to kick-off modelling from, so how do you start?Go into the back view and build a set of curves in the True View, which define the outline of your lamp cluster. There are only 2 views which you need to think about this is the most important. The second view is the left/side view, where the unit wraps around the rear corner of the car.

Projecting onto the body of the vehicle

When you do this you’ll definitely get the profile that you desire from the rear view, but what your lamp is going to look like in the right view is going to depend upon the surface shape of the rear corner of the car. It might be great, but normally it will be pretty horrid, so you may have to make a separate set of curves to project in the right view. Don’t worry if the 2 sets of curves don’t marry up, just modify your left view curves until the c-o-s updates with history and you have both sets of curves meeting as you require. USE CURVE COMBS AT ALL TIMES!!!!

Can I Section c-o-s?

Yes you can just like you do with any other intersecting curves.Which is the hardest part of making a lamp assy?

The lenses are by far the trickiest part.

Getting GO at the edges is really hard and if you don’t have GO then you can’t fillet them. This is very important if you are making a pre-production model, but if it’s going to be milled into a hard model  or modelled in clay, it’s better to put the fillets on at that stage.

Transparent Acrylic Shaders

You can download them from AliasDesign, but you’ll have to mess around with them for hours if you’re new to it, until you get them rendering in the way that you or the designer require.________________________________________________________________

Autodesk Alias Studio Tutorial – Automotive Rear Lamps


Alias Studio Tutorial

0_car_1

Professional Alias Trainer Graham Bullock

Alias Studio Rear Lamp Assembly

I have been working all day learning how to make a complete rear lamp assy. complete with reflectors, tri-coloured acrylics and obscuration textures.The top curve is no good, so today’s work flow goes down to a tough practise session in which a lot was learned.

Transparent Shaders

These are tricky to set-up and I had to do a lot of renderings to get even something near to what I needed.Here’s the rear end with the lamp cluster mounted:(I will soon be adding some renderings of the expanded metal grilles for this model)The whole model starts from a projection onto the sheet metal body. Once I had the C-O-S, I built the lamp from there.Alias Studio Rear Lamp Asssembly. Buiit just like a real lamp it has a tripple reflector with a chrome shader, then the acrylic lenses. Behind each lens is  another lamina, with a perforated metal shader. About 20 to 24 hours work for this styling model.________________________________________________________________

To Learn Alias Automotive to Industry entry level has been made easier. Why not visit my website and take a look for your self?

www.learningalias.co.uk

My New Website is now live!

I am a top flight Alias Trainer/Modeler, specializing in taking students who are either currently studying or who have left college/university and want to learn the skills they need to reach Alias Automotive Entry Level. I offer the best value Alias training deal out there!

Special Winter Discount Package

Courses in order of cost:

“Course #1”.6 months Website Access

6 Months website access to all video tutorials, 167 Euros one-off payment (228 USD equivalent Nov.2011)

Courses, including reviews and coaching:

“Course #2A” Private Tuition Package

167 Euros per month (228 USD equivalent Nov.2011)
(Your work will be reviewed every 15 days and you will receive : feedback, instruction, tips and advice from me personally, modeling demonstrations from me on your .wire and I will supply Meshes to help you with difficult areas of your model).

“Course #2E” Economy Private Tuition Package

100 Euros (135 USD equivalent Nov.2011) per month. You get your .wire reviewed by me every 15 days and you will receive : feedback, instruction, tips and advice from me personally. Access to all website videos

“Course #3”. Fast Track Full Pro. “One to One” Course

250 Euros (USD. 339 approx. Nov. 2011) per month. One to One Private tuition with weekly reviews of your .wire. You will receive specific geometry and meshes and modeling from me personally where required, to help you to complete your exteriors quickly to an Industry entry level standard. This means a bigger investment, but once in an Alias modeling job you will get back what you invested many times over and be able to work anywhere in the world

For more info,

Just register on my website and I’ll send you all the details
www.learningalias.co.uk

USA:

If you are in the USA, just register and login, then go to Profile and you can pay your subscription with your US credit card. Absolutely no extra charges for currency conversion.

Regards

Graham Bullock B.Ed.(CNAA)Des.Tech.

Nurbs Modeling

Autodesk Alias Studio Tutorial – Automotive Rear End – 2

>0_car_1

Alias Studio Automotive Rear End Cont’d,

Low, wide and sleek Porsche style rear end
Integral Soiler Prior to intersecting the tube section and trimming out the apertureAperture cut through integral spoiler to lighten the design feelToday I cut a large slot through the rear spoiler to give a lighter feel to the model I did this by building a rectangular curve set, duplicating it. Moving the top set forward and the lower set rearward. I then skinned a surface between the 2 sets and intersected it with the integral spoiler.

Radius tool for integral spoiler

Once I had trimmed away the protruding parts of the skin surface I trimmed out the top and bottom apertures in the spoiler.

Save out before trimming

To prevent loosing valuable work flow whilst trimming. I always save out my work before trimming anything that’s tricky. I do the trimming,but don’t save the trimmed work flow until the trim process has been successful. This has saved me countless heart aches.

When Building A Complex Alias Model

I save anything up to 100 different versions of the work flow. I make sure to date each file as I save it. This makes it easy to find the version you are looking for when something has to be binned or you need to import a part of your model which has been deleted erroneously. This often happens whilst trimming.

Alias Studio Expanded Metal Shader

Where I have used expanded metal shaders, I have duplicated the surface moving one surface back 5mm to create a backing surface, which I shade mat black. The front surface gets the metal shader. If I don’t use this work flow I can see the inside of the car through the grilles.________________________________________________________________

To Learn Alias Automotive to Industry entry level has been made easier. Why not visit my website and take a look for your self?

www.learningalias.co.uk

My New Website is now live!

I am a top flight Alias Trainer/Modeler, specializing in taking students who are either currently studying or who have left college/university and want to learn the skills they need to reach Alias Automotive Entry Level. I offer the best value Alias training deal out there!

Special Winter Discount Package

Courses in order of cost:

“Course #1”.6 months Website Access

6 Months website access to all video tutorials, 167 Euros one-off payment (228 USD equivalent Nov.2011)

Courses, including reviews and coaching:

“Course #2A” Private Tuition Package

167 Euros per month (228 USD equivalent Nov.2011)
(Your work will be reviewed every 15 days and you will receive : feedback, instruction, tips and advice from me personally, modeling demonstrations from me on your .wire and I will supply Meshes to help you with difficult areas of your model).

“Course #2E” Economy Private Tuition Package

100 Euros (135 USD equivalent Nov.2011) per month. You get your .wire reviewed by me every 15 days and you will receive : feedback, instruction, tips and advice from me personally. Access to all website videos

“Course #3”. Fast Track Full Pro. “One to One” Course

250 Euros (USD. 339 approx. Nov. 2011) per month. One to One Private tuition with weekly reviews of your .wire. You will receive specific geometry and meshes and modeling from me personally where required, to help you to complete your exteriors quickly to an Industry entry level standard. This means a bigger investment, but once in an Alias modeling job you will get back what you invested many times over and be able to work anywhere in the world

For more info,

Just register on my website and I’ll send you all the details
www.learningalias.co.uk

USA:

If you are in the USA, just register and login, then go to Profile and you can pay your subscription with your US credit card. Absolutely no extra charges for currency conversion.

Regards

Graham Bullock B.Ed.(CNAA)Des.Tech.

Nurbs Modeling

Autodesk Alias Studio Tutorial -Porsche Carrera Turbo Style Rear End

Does This Car Have A Rear End?

For weeks I have been showing you the front side and top of my Model, but I got an e-mail asking to see the rear end, so I thought I better spend today building one. Basically I built a lovely full volume center surface with good highlights and then I went Berserk and after projecting a curved rectangle onto the rear surface in the top view, I built a rectangle piggy backed onto it, pulled out the CV’s to create the big reverse louvre (Air Scoop) you see.

Massive rear intergral spoiler

I had four surfaces making up the center part of my rear volume I combined 3 of these, added some more< rows of CV’s at the LHS and RHS boundaries to protect them whilst I was pulling CV’s in a very radical way.ç

Proportional Modification Control

By spending about an hour setting this tool up to work the way I needed, I was able to pull a massive spoiler out of my combined volume. This is not the way it would be done in the Automotive Industry, as it is not an accurate way to work and leaves you with forms that are very difficult to modify, but I really wanted to see just what this tool would produce.

Real Life

you’d be modelling away and you’d get at least one visit a day from the stylist, asking for changes to your model, so you’d need a fee standing spoiler, that could be easily changed of substituted .
To Learn Alias Automotive to Industry entry level has been made easier. Why not visit my website and take a look for your self?

www.learningalias.co.uk

My New Website is now live!

I am a top flight Alias Trainer/Modeler, specializing in taking students who are either currently studying or who have left college/university and want to learn the skills they need to reach Alias Automotive Entry Level. I offer the best value Alias training deal out there!

Special Winter Discount Package

Courses in order of cost:

“Course #1”.6 months Website Access

6 Months website access to all video tutorials, 167 Euros one-off payment (228 USD equivalent Nov.2011)

Courses, including reviews and coaching:

“Course #2A” Private Tuition Package

167 Euros per month (228 USD equivalent Nov.2011)
(Your work will be reviewed every 15 days and you will receive : feedback, instruction, tips and advice from me personally, modeling demonstrations from me on your .wire and I will supply Meshes to help you with difficult areas of your model).

“Course #2E” Economy Private Tuition Package

100 Euros (135 USD equivalent Nov.2011) per month. You get your .wire reviewed by me every 15 days and you will receive : feedback, instruction, tips and advice from me personally. Access to all website videos

“Course #3”. Fast Track Full Pro. “One to One” Course

250 Euros (USD. 339 approx. Nov. 2011) per month. One to One Private tuition with weekly reviews of your .wire. You will receive specific geometry and meshes and modeling from me personally where required, to help you to complete your exteriors quickly to an Industry entry level standard. This means a bigger investment, but once in an Alias modeling job you will get back what you invested many times over and be able to work anywhere in the world

For more info,

Just register on my website and I’ll send you all the details
www.learningalias.co.uk

USA:

If you are in the USA, just register and login, then go to Profile and you can pay your subscription with your US credit card. Absolutely no extra charges for currency conversion.

Regards

Graham Bullock B.Ed.(CNAA)Des.Tech.

Nurbs Modeling
________________________________________________________________

Autodesk Alias Studio Tutorial – Rear Spoiler

Both the vent and the BIG spoiler are done with thw Alias Poroportional Modification Tool

I have been away on other projects, so my Porsche Carrera Turbo Special Body Kit type exterior has been on the back boiler

Rear Spoiler Appears

As you can see I’ve gone mad and created a rear spoiler. I personally made the clay model for the Audi TT rear spoiler back in 1999. Rear spoilers are tricky beasts. There are no datum surfaces to measure from, but us Alias modellers live in that crazy world.

How to start

Make an ellipses in the top view and project it onto the body where you want your spoiler uprights to stem from.

Make a smaller ellipse and move it vertically up and back a bit from the base c-o-s. Run a skin surface between these 2 ellipses to surface your supports.

Build 3 cross section curves for your  spoiler wing . That’s 1 on the LHS, 1 on Y0 and mirroe the LHS over to form no. 3 on the RHS. Now skin the 3 curve sets hold down shift for the 3rd one.

Close the open ends of the wing off with a planar surface or a surface which is appropriate for your model.

Top view, project an trim divide to form the movable aileron and allocate a different shader to it. I have a 3mm parting line , but you can’t see it in the little jpeg.

However complicated the surface intersection of say a spoiler or mirror maybe, I always start by projecting curves onto the parent surface to for c-o-s to build from.

NB: I’m still on the most basic wheels possible. Just like designing a car exterior in the automotive industry, where the only import thing about the wheels for the first few years of a project is the dimensions. The wheels ate the icing on the cake and come last.
To Learn Alias Automotive to Industry entry level has been made easier. Why not visit my website and take a look for your self?

www.learningalias.co.uk

My New Website is now live!

I am a top flight Alias Trainer/Modeler, specializing in taking students who are either currently studying or who have left college/university and want to learn the skills they need to reach Alias Automotive Entry Level. I offer the best value Alias training deal out there!

Special Winter Discount Package

Courses in order of cost:

“Course #1”.6 months Website Access

6 Months website access to all video tutorials, 167 Euros one-off payment (228 USD equivalent Nov.2011)

Courses, including reviews and coaching:

“Course #2A” Private Tuition Package

167 Euros per month (228 USD equivalent Nov.2011)
(Your work will be reviewed every 15 days and you will receive : feedback, instruction, tips and advice from me personally, modeling demonstrations from me on your .wire and I will supply Meshes to help you with difficult areas of your model).

“Course #2E” Economy Private Tuition Package

100 Euros (135 USD equivalent Nov.2011) per month. You get your .wire reviewed by me every 15 days and you will receive : feedback, instruction, tips and advice from me personally. Access to all website videos

“Course #3”. Fast Track Full Pro. “One to One” Course

250 Euros (USD. 339 approx. Nov. 2011) per month. One to One Private tuition with weekly reviews of your .wire. You will receive specific geometry and meshes and modeling from me personally where required, to help you to complete your exteriors quickly to an Industry entry level standard. This means a bigger investment, but once in an Alias modeling job you will get back what you invested many times over and be able to work anywhere in the world

For more info,

Just register on my website and I’ll send you all the details
www.learningalias.co.uk

USA:

If you are in the USA, just register and login, then go to Profile and you can pay your subscription with your US credit card. Absolutely no extra charges for currency conversion.

Regards

Graham Bullock B.Ed.(CNAA)Des.Tech.

Nurbs Modeling, Alias Course

Autodesk Alias Studio Tutorial -Wheel and Tyre

100% of donations go to provide food shelter and education for the abandoned Street Children of Nepal. Please give a few USD/Euro back. Why not do it right now by C.C. or Paypal? Charity credetials: BUDDHA MEMORIAL CHILDREN’S HOME TRUST. Registered Charity No: 1115373 . Thank you, graham bullock

Pictured below is an Audi A5 Sportback built by one of my students who is now a Digital Sculptor for GM.

Full HD video, just click the picture below

I am now putting some of my tutorials on YouTube, so whilst you’re there you may wish to check them out. There’s a full tutorial on how to create a Ball Corner to Class A Surfacing, Catia V5 spec.

how to build a car

Click Here for Videos

See just how quickly you can learn Automotive Modeling, with a Pro. Alias Trainer to help you

NURBS FROM MESH VIDEO click here

For student’s who have the objective of finding a CAD job in the near future, I still teach One to One students and all of these students get Automotive Modeling or Design/Modeling jobs, so it’s a great investment to make.

Check-Out my Customer Feedback,

Many of my students make it to the top and succeed in becoming pro. Alias Digital Modelers. The hourly rate is very high and there are vacancies in UK. France, Germany, USA, Brazil etc.

On my website I teach you how to build the models you need to get accepted at interview. Why not take a look?

Go to Learning Alias

Here’s a request for a wheel and Tire Tutorial

“hi there mate, i looked at this wheel design and your other recent posts, you got some quality work there. I’m new to alias and still learning basic techniques and tools and stuff i have been looking at tutorials also looking for tutorials to make a car wheel….would you be able to send me or write me a tutorial in how to make a wheel for a car with tyres??” Abdul Wahid

Thanks Abdul for Reading My Site and for your Compliments Regarding My Models.

You’ll find my 5 part “Styling Wheel” tutorial here:

https://blog.learningalias.co.uk/alias-wheel-tutorial-1-533Finished-1dAnd if you are serious about Learning Alias you simply have to register with Alias Design Community – Forum:

http://aliasdesign.autodesk.com/learning/tutorials/

This is where you will find a first class tutorial on Modelling Automotive Wheels and Tyres in Autodesk Alias

“Wheels: Parts 1 – 2 – 3.”

Posted April 3, 2009, 10:26 pm by ,Fridolin Beisert

As a general comment to anybody learning Alias Automotive modelling, I wouldn’t recommend that you spend too much time on wheels in the early stages of learrning to build a virtual car. It’s far more important to learn to set up your Stage with Image Planes or Canvases and to set up your grid with the correct dimensions and then learn to produce perfect curves upon which the quality of your surfaces will depend.Also I strongly recommend that you do all the Alias Studio Tutorial Modelling Tutorials, starting with the chair and then going on to do the shower gel bottle and then the teapot and the mouse etc. These tutorials are where you learn the solid basics of working in and understanding Alias.Getting started with an automotive model in Alias. Canvas planes are much more helpful to work from than image planesIMHO every tutorial you do will teach you some new and deeper level of Alias.Sorry my images are not displaying. I’ll get it fixed real soon!To Learn Alias Automotive to Industry entry level has been made easier. Why not visit my website and take a look for your self?

www.learningalias.co.uk

My New Website is now live!

I am a top flight Alias Trainer/Modeler, specializing in taking students who are either currently studying or who have left college/university and want to learn the skills they need to reach Alias Automotive Entry Level. I offer the best value Alias training deal out there!

Special Winter Discount Package

Courses in order of cost:

“Course #1”.6 months Website Access

6 Months website access to all video tutorials, 167 Euros one-off payment (228 USD equivalent Nov.2011)

Courses, including reviews and coaching:

“Course #2A” Private Tuition Package

167 Euros per month (228 USD equivalent Nov.2011)
(Your work will be reviewed every 15 days and you will receive : feedback, instruction, tips and advice from me personally, modeling demonstrations from me on your .wire and I will supply Meshes to help you with difficult areas of your model).

“Course #2E” Economy Private Tuition Package

100 Euros (135 USD equivalent Nov.2011) per month. You get your .wire reviewed by me every 15 days and you will receive : feedback, instruction, tips and advice from me personally. Access to all website videos

“Course #3”. Fast Track Full Pro. “One to One” Course

250 Euros (USD. 339 approx. Nov. 2011) per month. One to One Private tuition with weekly reviews of your .wire. You will receive specific geometry and meshes and modeling from me personally where required, to help you to complete your exteriors quickly to an Industry entry level standard. This means a bigger investment, but once in an Alias modeling job you will get back what you invested many times over and be able to work anywhere in the world

For more info,

Just register on my website and I’ll send you all the details
www.learningalias.co.uk

USA:

If you are in the USA, just register and login, then go to Profile and you can pay your subscription with your US credit card. Absolutely no extra charges for currency conversion.

Regards

Graham Bullock B.Ed.(CNAA)Des.Tech.

Nurbs Modeling, Alias Course